I hereby call to order the first meeting of the Tonefiend DIY Club!
Our mission: To attain tonal mastery over our guitars, amps, and effects with the least possible damage to our gear, bodies, homes, and pets. When the smoke has cleared (and all the smoke alarms have been reset) you’ll be able to install pickups, customize your guitar’s electronics, mod and build stompboxes, repair cables, and brag about your technical prowess while waiting in line to file your insurance claims.
Take it from one of the laziest and clumsiest people ever to brandish a soldering iron: Anyone can learn these skills. They’re fun and creative, and they’re one of the best ways to “own you tone,” if I may borrow the Seymour Duncan motto.
As promised, this material will be suitable for absolute beginners. (Though I hope more experienced guitar hackers join in, because we’ll really need your help!)
Read on for lists of what you’ll need to build our first three projects, plus recommended reading while waiting for your stuff to arrive.
And what are the projects, you ask? The first will be a fat-sounding overdrive, then an obese-sounding fuzz pedal, and then a combination buffer/clean booster. All are simple builds, but sound-wise, they’re serious business. Trust me, most players will welcome these great-sounding effects to their pedalboards. (As far as I know, none are available commercially, though many boutique builders have pillaged extensively from some of the same sources I’ve used.)
We’ll start out by building the circuits on a electronics breadboard. That way, you can learn how the circuits work and experiment with custom mods right out of the gate. You’ll only need to do a bit of soldering at this point, and you can keep your valuable guitars far from the danger zone.
Once you arrive at a sound that excites you, you’ll learn to build it into a pro-quality enclosure. (The stompbox hardware tends to be more expensive than that electronic components, so why fork over the cabbage unless you have something you love?) More advanced soldering skills will come into play here.
Once you’ve acquired some chops via the initial projects, we’ll try some work on actual guitars, like control mods, pickup installs, and internal effects. And after that? I’m not sure yet, but I’m thinking globothermal nuclear annihilation (but only of you guys are up for it).
Make sure to read the “Where to Buy” section below before ordering anything! Some items are available in pre-assembled kits.
PART 1: Tools and Supplies
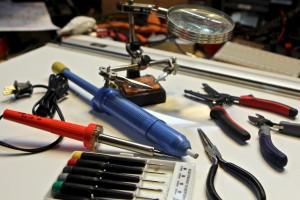
Tools. (Click the links to see examples.)
1. 30-watt+ soldering iron. You could work with a smaller iron, but you’ll appreciate the extra power. If you suspect you might be into this long-term, I definitely encourage you to invest in a high-quality soldering station, which you can read about this superb Soldering 101 article from Beavis Audio Research. Don’t get one of those big soldering guns, which are too powerful and unwieldy for electronic work.
2. Desoldering pump. I’m not saying you’ll make lots of soldering mistakes, but I certainly do!
5. Flush-edged wire cutter (most wire-strippers have a cutter, but you’ll still want the flush-edged cutter for tight spaces)
7. A digital multimeter. The cheaper ones will definitely get the job done, but make sure you get one with a continuity function (basically, a beeper that informs you whether two points in a circuit are connected). Also, if you suspect that you may want to build a lot of fuzz pedals, especially ones with finicky germanium transistors, you’ll eventually want a meter that can read hFE values (these relate to transistor gain). Many cheaper meters don’t have an hFE function. Auto-ranging is another desirable, but not absolutely essential, feature.
8. A helping hand or PanaVise to hold your work-in-progress.
You should be able to find all of the above for around US$40, especially if you shop from a discount house like Harbor Freight. And I bet you already have at least some of these items!
You might also consider the Learn to Solder Kit, from the organization that sponsors the fabulous Maker Faire. This includes a decent iron, some supplies, and a practice circuit board to destroy learn on.
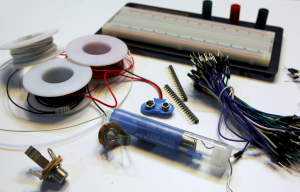
Breadboard rig and supplies. This list includes everything you need to assemble a circuit-testing rig where you can audition things before soldering them into place, plus your soldering consumables.
1. A breadboard and jumper wires. These are sometimes sold together.
2. Two mono input jacks to get your guitar signal to and from the breadboard.
3. 9-volt battery snap to power your breadboard.
4. 24-gauge hookup wire (I recommend getting at least three colors: black, red, and white)
5. SIP socket so you can change components in your soldered-together circuits
Estimated cost: $15 to $25
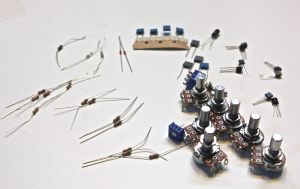
Parts for Projects 1, 2 and 3. Everything you need to breadboard and audition our first three projects.
1. Diodes. One each of the following values: 1N4001 and 1N34A. Two each of the following: 1N914 and 3mm red LED.
2. 1/4-watt metal-film resistors. One each of the following values: 10K, 68K, and 2.2M. Two each of the following: 470R, 4.7K, 1M. Plus three 47K resistors.
3. Capacitors (polyfilm or box-style). Once each of the following values: .001uF, .047uF, .068uF, and .22uF. Additionally, you’ll need four .1uF capacitors.
4. 16V radial-style electrolytic capacitor, value 10uF.
5. Transistors. Two each of the following: 2N3904, 2N5088, 2N5089, 2N5457.
6. 16mm potentiometers with solder-lug connectors. One each of the following values: B5K, B100K, and C10K, plus three A100K pots.
7. Trimpot (25K or 50K)
8. One DPDT switch, on/on style.
Estimated cost: $15 to $20. (The cost can be substantially lower when you buy in bulk.)
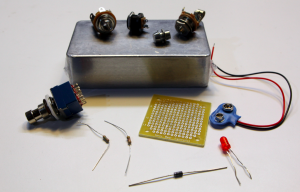
Boxing supplies. Everything you need to move a circuit you like from the breadboard into a permanent stompbox home (with a DC power jack, LED indicator, and true-bypass switching). If you want to box all three projects, you’ll need these things in triplicate.
1. 1590B-style enclosure. These boxes must be drilled to suit the project, but all projects will use common drilling patterns. (See “Where to Order” for more details.) If you have a drill press and know how to use it, you can save a few bucks by drilling your own. Some vendors also offer finishes.
2. 3PDT footswitch. Your basic true-bypass switch.
3. Stereo 1/4-inch jack for input. (The stereo configuration lets you avoid battery drain when no guitar is connected.)
4. Mono 1/4-inch jack for output.
5. DC power jack. (I recommend the washer-on-the-outside style.)
6. 5mm red LED.
7. 5mm LED bezel (the thing that holds the LED in place).
9. 1N4001 diode.
10. 2 1/4-watt metal film resistors, values of 4.7K and 1M.
11. 16V radial-style electrolytic capacitor, value 22uF
12. Small perfboard where you’ll solder the components.
Estimated cost: $15 to $20 (The cost can be substantially lower when you buy in bulk.)
Where to buy. You generally get DIY supplies from two types of vendors: big electronics supply houses (such as Mouser, Digi-Key, Allied, and Jameco) and smaller dealers who specialize in stompbox and guitar parts (such as Small Bear, Pedal Parts Plus, and Mammoth. All are US-based, and all are reliable. I don’t know much about overseas vendors, though I hear good things about Germany’s Banzai Music. The big suppliers have larger stock lists, but often lack the obsolete specialized parts guitar geeks want.
Harbor Freight sells incredibly inexpensive tools. Obviously, this isn’t top-of-the-line stuff, but it will generally get the job done.
The initial DIY Club projects are breadboard- and stompbox-based, but once we start poking around inside guitars, you may need the services of a guitar parts supplier like Stewart-MacDonald or All Parts.
Meanwhile, the folks at Mammoth have helped us out by assembling all the non-tool essentials into three special kits:
• The Tonefiend Breadboard Rig and Supplies Kit ($21.43).
• The Tonefiend Parts Kit for Projects 1, 2 and 3 ($16.87).
• The Tonefiend Boxing Kit ($15.76). Mammoth gives you the option of getting a pre-drilled enclosure for a couple of bucks extra, which I recommend, unless you own a drill press and know how to use it. Each of our first three projects calls for two knobs, so select the “Vert 2 Knob/Toggle, 1LED, 1FS” option when checking out. If you have an advanced sense of style, you may also choose a custom paint job or upgrade the included knobs to something fancier.
I can’t guarantee these are the lowest prices you’ll find, but I know they’re competitive, and that you can get everything you need with a couple of clicks, including a pre-drilled enclosure. Also, those pesky small parts will be clearly labeled—a big advantage when you’re just starting out. (Disclosure: Neither I nor Seymour Duncan have any financial stake in these packages.)
Meanwhile, if you suspect you may become a regular builder, I encourage you to stock your workbench with the cheapest components I’ve found anywhere: the Futurlec Value Packs. If I were you, I’d order everything on this page except the Voltage Regulator, 1/2-watt resistors, IDCC Connector, and IC Socket Pack. The only catch: really slow shipping. It can take three weeks or more for your parts to meander from Asia to the US.
PART 2: Recommended Reading
Here are three fine “electronics for beginners” books:
Getting Started in Electronics by Forrest M. Mimms III
Electronics for Dummies by Cathleen Shamieh and Gordon McComb
Make: Electronics Book by Charles Platt
But to be honest, most of you self-education is likely to take place online. I particularly recommend three stompbox-building sites as great places for beginners to learn.
diystombboxes is probably the largest online builders community. Their forum is a great place to ask questions, and the FAQ section of the diystompboxes wiki is so helpful you may want to print out a hard copy, if not tattoo it on your forearms.
My favorite DIY writer is Dano from Beavis Audio Research. Sadly, his site is dormant, but his many fine articles are still posted there. He’s funny and pragmatic, with a knack for zeroing in on the crucial info. I recommend everything in his Tech Section, especially this, this, this, this, this, this, this, this, and this. And be sure to archive copies, in case this resource ever vanishes.
Gaussmarkov DIY Effects is more sober than the fun-loving Beavis site. But in addition to hosting many fabulous stompbox projects, Gaussmarkov boasts a fine tech section with articles dedicated to all the key components.
PART 3: If you just can’t wait to get started…
Order and build a kit! It’s a great way to learn on the fly, and the projects from Build Your Own Clone, General Guitar Gadgets, and Guitar PCB (distributed by Mammoth) include newb-friendly directions. Start with a nice, simple booster or fuzz clone. In fact, if I were to recommend one beginners project, it would be Build Your Own Clone’s E.S.V. Fuzz (Germanium version). If you don’t burn your house down, you’ll emerge with a superb-sounding vintage Fuzz Face that matches any boutique version, and surpasses most of them.
PART 4: The sadly necessary disclaimers.
Proceed at your own risk. Read all instructions. Protect your body parts. Don’t try to sue me, Seymour Duncan, or anyone else if you do something dumb. Don’t work on expensive things till you’re confident of your skills. If in doubt, consult a qualified guitar tech or psychiatrist. Look both ways before crossing. Don’t mix grain and grape. Never start a land war in Asia.
Also: I’ll try to walk folks through these projects clearly and carefully, but there simply aren’t enough hours in the day to offer personal tech support to all participants. My hope is that we’ll establish a nice, cooperative community where we can pool our talent (or at least dilute our lack of talent). I’ll help out as much as I can, but please don’t hate me if I can’t personally inspect all your solder joints.
This is going to be a blast! We can discuss further in the comments below. I’ll roll out that initial overdrive product in a week or two after folks have had time to assemble their tools and parts.






YES.
Just ordered the three supply kits from Mammoth. Looking forward to the learning curve. My only previous experience has been assembling a “Large Beaver” Muff clone from BYOC (quite successfully I might add – great pedal). I’m hoping that in doing these upcoming projects that I will learn at least a little something about what the various components are and do rather than simply be instructed to “stick this here and that there”. I feel that the pedal I built before was a pretty big accomplishment for a first build, but I still know absolutely nothing about what I did or why it does what it does.
I made one of those too—that’s a pretty ambitious first build! Glad it worked out. Keith at BYOC has done so many cool designs. I like how most of his clones have some cool twist, like variable tone stacks in the Large Beaver.
Definitely check out some of those articles I linked too, especially this one: https://www.beavisaudio.com/techpages/HIW/hiw1.gif
there’s some nice cheap kits here too: https://www.modkitsdiy.com/ i’m thinking piledriver from there + uglyface (when i find decent schematics, i’ll post more – other than that, here’s what i am going by so far – https://www.home-wrecker.com/articles.html). I already have most of the gear in this list to get started.. being in australia does put me behind everyone, since if i order gear it takes awhile to get here. I’ll also post again if i find (local) reliable sources for bits.
omg.. check this out too – http://www.madbeanpedals.com/projects/index.html
Yeah, Madbean’s stuff is great. I know him from my very favorite DIY site, http://www.freestompboxes.org.
I didn’t mention freestompboxes in my intro post, because it’s not really newb-oriented. But it’s an amazing community of passionate hackers and builders. Also, much of the content there is based on reverse-engineering vintage, modern, and boutique stompboxes. The latter pursuit is a controversial one. Some boutique builders hate the site because of this. Others love and contribute to the site for the same reason. One thing that becomes apparent very quickly is that the vast, vast, VAST majority of boutique builders recycle a dozen or so classic designs. Anyway, FSO is definitely worth checking out, but be aware that you must join (for free, of course) before you can access some of the assets.
Being an “overseas” DIYer, besides Banzai that you mentioned I also could recommend another german-based supplier: Das Musikding https://www.musikding.de/
Had good, hassle-free experiences from both of them.
I’m in there like swimwear.
Joe a while ago I bought a mod kit from Wmapler pedals before they mad just pedals, I modded a Boss SD-1 into a TS9 on steroids.
I also built an amp form the site AX84.com Thier Hi-Octaine
Nice! I love the mammoth kits idea. Saves me the headache of researching the individual parts when it’s all still greek to me.
I’ll get a soldering iron later in the week.
Really looking forward to this!
Cool, Danny! Glad to have you aboard.
Regarding parts: Just remember that, if you get seriously into this, you can get parts WAY cheaper in bulk. Parts that cost 20 cents purchased individually might sell for 2 or 3 cents in bulk.
I got my beadboard kit the other day. I’m ordering the parts this weekend. \m/
I’ve been looking into getting one of the kits from BYOC but have hesatated, I’m all onboard ffor this.
Awesome! And let me say, in all seriousness, that there is no one I would rather build a fuzz pedal with than someone named Dirtbagg! 🙂
When are we building an analog delay?
Joe – You should contact Stratdeluxer97 on the Duncan Forum (AKA John Spina). He might have a little bit to add here…
When will we build an analog delay? I’m just guesstimating here, but I’d say, um, approximately when hell freezes over. 😉
Seriously, we could get into relatively complex stuff like that eventually. But after building several analog delays, I’m fairly well convinced that it’s not worth the effort of making them from scratch. The best analog fakes sound really, really good. There’s not a ton you can do to hotrod the extant circuits. There are several great kits out there. And for the first time in a long time, you can choose from several fantastic new production analog delays, including the Way Huge Aqua Puss (for simpler applications) or the Seymour Duncan Deja Vu (for trickier stuff).
Maybe I’ll eat those words. But let’s try a couple of one-transistor booster, overdrives, and fuzzes first, shall we? 😉
Just got my stuff. When do we start?
Excellent question, Swen! 🙂
Let’s say Monday, shall we? I’m going to try to get the initial tutorials done over the weekend, and we should be able to dive in right after. I’ll post an update announcement on the front page soon.
Really glad to have you aboard!
Sign me up! I’ve been doing this kind of stuff for over 30 years. This should be fun.
So glad to have you aboard, Bryan. Now I’m going to make you explain to me why the vibrato pedal I’ve been trying to build never works right! 😉
This sounds like fun. I’ve already built 5 BYOC pedals and I’ve done most of BillM’s mods to my Blues Jr. It would be nice to know a little about what I did instead of just connecting the dots.
Ahh!!! this is just what I have been hoping for since I started playing an electric guitar…ie,to be able to make my instruments or at least take an instrument and make it remarkably better. I saw a band from Uganda who played at the clark museum in Mass, USA and as they introduced themselves they talked about their instruments and how they made them. To be a musician in Uganda, you must first make your instrument. i find that bit of culture exciting. but then there are the ::EVEN WITH THE POWER OFF THERE ARE DANGEROUS VOLTAGES FLOATING AROUND THAT WILL KILL YOU IF YOU TOUCH TOO MUCH:: disclaimers that scare me away from touching anthing other than a plug. geez the first thing i want to make is a discharge button that will show me that all the power is drained and its safe to tinker. yea sure a voltometer w/e. anyway thanks for putting this together.
Hey Joe,
Super stuff. Thanks for thinking of us in our “pedal prone” world. Looking forward to seeing how this all comes together. Having built and modded many pedals, it is really rewarding when they work (and work again, after modding).
Robert
SO where exactly do I sign up at? I am really looking forward to this I love working on guitars, I never thought I would have this much fun, I actually think sometimes I enjoy modding or refinishing then I do playing them, well that how it was until last month when I achieved the perfect sound for a certain style song I have been working on.
Oh, there’s no actual sign-up. Just keep checking in here. We had a first online meeting last night in the chat room. And this weekend, I’m going to try and finish up some photo tutorials for some of the first projects.
As a long time electronics tech and guitarist I am very happy to see you taking on this subject as it brings it more into the mainstream. IMHO any electronics that musicians learn makes them a better and more capable player. When I used to do amp and electronic repairs for players it was always easier to communicate and solve problems for those with even a few technical chops. At the very least some electronic knowledge will help solve those unexpected problems that occur at gigs since most are very simple to fix. Pedal building is a great start since it is relatively safe and introduces the basics in a hands on manner. Thanks.
Thanks for the comments, Matthew—though they make me feel a bit embarrassed, because it took me a long time to realize how much a smidgen of tech know-how could bring to one’s playing. Pragmatism is only part of the equation. Once you start poking around with this stuff, you start making musically relevant discoveries, ones that affect your playing, writing, and recording. I’d be thrilled if you dropped by the DIY post and shared a bit of your knowledge with us ignoramuses. (Or is that “ignorami?”) 😉
sign me up
Consider yourself signed! The first project file is up!
Okay Joe, I’ ordered my kits today (breadboard and project components) as well as Mimms electronics book. I’m all in! Great idea, thanks!
where ya been all my life! Finally a REALLY good use for the medium, great info cant wait to get started
Glad you found it! Good look building! 🙂
Just ordered up the kits. I haven’t breadboarded since college EE class!
Put together the entire package first 3 kits , starter tool set with the octave fuzz package,1 boxing kit too. Now if I just knew WTH I was doing! Going to be a long path to follow, so much info to absorb. Wish me luck I need it.
You can do it! Tell us how it goes. 🙂
Signal tester and confidence builder completed so far but it is just amazing how little I know and the zero skill I have ! Going into the first breadboard diy #1 today fun fun !
Oinkus, they are great pedals, and not that hard to build. Just double check your connections before sealing it up. :what:
These projects are so rad! Thanks for doing this, I’m totally hooked. Almost done with project 1, but stuck on part 4 page 20. Literally the last couple connections!!! It’s killing me, I know you explained the switch on page 13, I’m just a little confused on the “a third short wire connecting this input jack lug to the center lug of the footswitch”
It seems like I should run a wire from the center lug on the switch to innermost lug of the input jack, but it doesn’t look like thats what was done in the photo? My apologies, I’m a complete rookie, and am still trying to wrap my head around this whole grounding thing!
Is there anyway I could see a clearer picture of that part of someones pedal?
SOOOO close! 🙂
I’m glad you’re enjoying the projects. I certainly had fun putting them together.
LOL — I can’t tell what’s going on in the picture either! But yes, if you follow the verbal description, you should be good to go. Really, all that’s necessary are that the inner lug of the input jack, the ground wire from the circuit board, and the middle lug of the footswitch are all connected to ground. I usually connect all three at the footswitch jack, only because the hole is bigger and it’s easiest to fit in all the wires. But you could also have the three wires meet at the footswitch lug, or have two of them meet in either lug, with a wire connecting the junction to the third point. Use your multimeter’s continuity function to verify the connection — you should hear a beep when touching any two of the three points.
Hope that helps! And I hope you’re addicted! Let us know how it goes! 🙂
Doode! Thanks so much for getting back to me, that is super rad of you! That makes total sense, much appreciated. I’m stuck at work, with no soldering iron but I just ran a jumper cable from that center lug to the innermost lug of the input jack (i already had the ground wire from the board and the black wire from the volume pot connected) and ran a multimeter to all 3 points (obviously two at a time) and it beeped!! Man, the day can’t end quick enough, I can’t wait to get home, finish those last connections up and plug her in. Thanks again, and yes I am totally consumed, addicted, all of the above. Can’t wait to start on project 2 tomorrow night! I’ll keep you guys updated, because I am almost positive this won’t be my last comment on this board. This stuff is starting to make more and more sense with every project page I turn. Can’t wait till it all clicks!
yikes just shorted out the LED, i think? Probably shoulda waited till those last ground connections were soldered. I’m hoping the jumper cable slipped and shorted out the LED or bypassed the resistor or something…I’m gonna add a new LED and start there.
Up the Punx!!
Multimeter will kill an LED poof ! Just learned that one a couple days ago.
Yeah — and they die so FAST!
But remember — your pedals can still make
god-awfulcool sounds, even with fried LEDs.Troubleshooting for days!! No audio happening. LED turns on though so I guess I did something right? Yea man, not exactly sure whats going on. Just going through everything with the multmiter to see where the weak link might be. I hope I didnt burn something out, when I plugged it in yesterday? The weird thing is that when I check the font middle lug on the footswitch (where the resistor connects) with the center lug and outermost lug on the input jack, the mutlimeter shows a weak reading when checking for continuity. Where as checking the other spots the meter shoots all the way over to 0 (I’m using an analog multimeter). Bad solder joints? That explanation probably doesn’t make much sense, but if anyone has any insight what so ever it would be greatly appreciated! I’m gonna keep on trouble shooting over on this end. Man, it can be rather deflating when you go through all that and the pedal doesn’t work. It must feel the exact polar when works. I’m like a junkie chasing that first high, only I can’t OD, and I have something to show for all the spent money and time put in. I will get it working, I have too!!
UP THE PUNXXX!!!
is it possible that I could have burnt out a capacitor? Everything seems to check out on the multimeter up until the 1st capacitor right where signal hits the board? And when I put the leads on the cap I get nothing as opposed to the other components. Major bummies.
ITS ALIVE!!!!!!!!
I had the switch wired incorrectly. I started looking at a spare switch I had and was testing it with a multimeter, and realized I made a mistake. I had it my box with the the metal tabs on the switch facing the top and bottom of the box, instead of facing the sides of the box. So the first time I wired it like it was facing the right way so the swithing was all wacky. Long story, I shot some trouble and completed my first build! Hooked for life, can’t wait for project 2. Thanks for making these projects , super rad!!
UP THE PUNXXX!!!