The Pagey Project, Phase 2:
An INSANELY Versatile Les Paul

Just how many colors can you coax from one guitar?

This post is about a guitar wiring scheme that only geeks and tweakers could love.

I think you’ll dig it. :satansmoking:

In Phase 1 of this project, I recreated the original Page wiring scheme using an ’82 Paul, a pair of Duncan ’59 model pickups, and four push-pull pots. The result was a great-sounding, almost absurdly versatile guitar, though the sheer number of options was downright bewildering.

So naturally, the only way forward was to make the instrument even more bewildering by adding additional sonic options. This version offers all the sound of the Phase 1 model, and a buttload more. Several buttloads, actually — and I’m not talking about those skimpy metric buttloads!

I gutted all the Phase 1 electronics. (Man, that hurt!) Next, using the same pickups, I added a pair of Duncan Triple Shot Mounting Rings. These provide four settings per pickup: humbucker, inner coil split, outer coil split, and both coils in parallel. (The Phase 1 plan offers only one split-coil setting per pickups. While you can configure the two pickups in parallel, you can’t do so with the individual coils in each pickup like you can here in Phase 2.) Here’s the wiring diagram I worked from, which for some reason is no longer posted on the Duncan site.

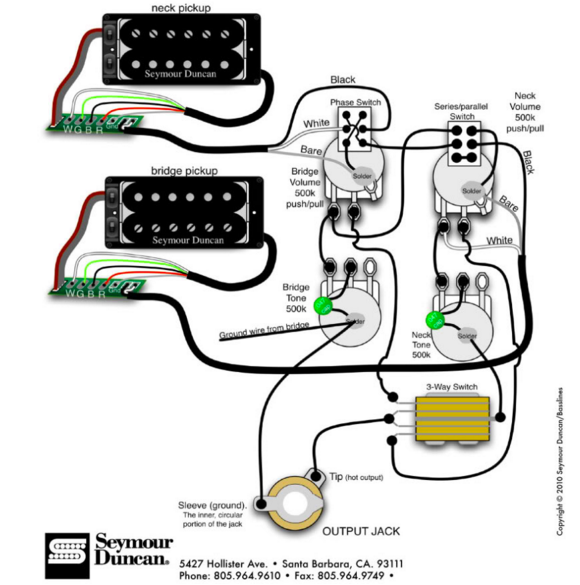
Since the Triple Shots add four new switches, the Phase 2 wiring requires only two push/pull pots. I wan’t about to let that real estate go unused! I installed a homemade germanium overdrive circuit (similar to the one we made in DIY Club) inside the guitar. My third push/pull pot activates it, and the fourth selects between two input caps, so I get a choice between a fat, Sabbath-style drive and a brighter, thinner Bluesbreakers-type tone.

Check out the demo video:

At some point I said I’d perform the Phase  2 surgery with a pair of Duncan P-Rails, which, unlike the ’59s, were specifically engineered for coil-splitting. with one coil yielding a Fender-type single-coil sound, and the other mimicking a P-90. And I did try that — and simply didn’t like it as much as the results I got with the ’59s.

Don’t get me wrong — the P-Rails are cool pickups, and I love how they worked for me in this post. But on this particular guitar, the retro flavor of the ’59s just moved me more. (And as I mentioned out in Part 1, I’m blown away by how great the ’59s sound in split-coil mode.) The only disadvantage of the ’59s is that there’s less contrast between the split-coil sounds within each pickup. Still, I hear plenty of difference between the two bridge-pickup coils. And while the two neck-pickup coils sound similar when heard solo, switching between them brings out cool  shadings in blended settings, especially the out-of-phase ones. So I’m cool with the compromise. 🙂

One of my tone controls doubles as an input capacitor switch for the built-in germanium overdrive. A 683 capacitor provides a fat, Sabbath-style tone, while a smaller 103 does the edgy, treble-booster thing. The third cap on the side is the usual 473 for tone control..

A few words about the onboard booster: If you’ve built the Fiendmaster project from DIY Club, you’ve probably noticed that it fits on a tiny piece of perfboard. It was easy to fit the circuit and a 9-volt battery inside the Paul’s control cavity — a lot easier than cramming it into a standard Strat-type guitar!

I replaced the guitar’s mono input jack with a stereo jack, and connected the battery’s negative terminal to the jack’s middle lug so there’s no current draw when the guitar is unplugged. (And FWIW, a simple boost circuit like that, with no power-indicator LED, runs for months and months on a single battery.) I omitted the input capacitor from the perfboard, but wired two different input caps to one of the vacant push/pull switches, as shown in the photo. Works great! (You could use the same technique to switch between two different tone-pot cap values — a sort of minimalist Vari-Tone.)

Man, I learned so much from this process! I’m now a total convert to split-coil humbuckers, and I’m becoming addicted to the out-of-phase sounds as well. The in-series sounds, both per pickup and between the two pickups, thrill me less, though I hear a few cool tones, and perhaps they’ll be perfect in some musical contexts.

But that’s the coolest thing about this exercise: You can pick and choose whichever aspects you dig the most. For example, I’d be totally stoked to play a dual-humbucker guitar with, say, two volume controls and one tone control, with coil splits and a phase switch accessible via three push/pull pots.

So: Can anyone who’s not a math dope like me calculate the number of available settings for the Phase 1 and Phase 2 projects? (Not counting the variations you get by adjusting relative pick balances, tone controls, or overdrive circuit — just the basic pickup combinations.)

70 comments to The Pagey Project, Phase 2:
An INSANELY Versatile Les Paul

  • Woah. I’d say 108 options (3 options per pickup, plus phase/ no phase, plus minitonefined or not, plus 3 possible pup combinations… Not sure, though!) 

    You, sir, are a master tinkerer! To think I’m struggling with the pedal format and you crammed that thing IN THE GUITAR!! I’m amazed. 

  • Thomas

    My count with this wiring is 216 different settings.
    First, we have the 4 options available to each pickup on its own via the Triple Shot rings. (4+4=8)
    We also have 16 base coil options with both pickups selected (4×4=16)
    Multiply the 16 combined positions by 2 for series/parallel (16×2=32)
    Multiply by 2 again for in phase/out of phase (32×2=64)
    Add the original 8 single-pickup settings (64+8=72)
    Multiply by 3 for overdrive off/on with 683 cap/on with 103 cap (72×3=216)
    If you can’t find the right tone with all those switches, it’s certainly not the guitar’s fault! 🙂

    Yes, I think this settles it.  I definitely have to try this wiring for myself! 

    • Thomas

      The Phase One wiring should have “only” 20 different settings:
      2 options per individual pickup (2+2=4)
      4 options with both pickups on (2×2=4)
      Multiply by 2 for series/parallel (4×2=8)
      Multiply by 2 for in/out of phase (8×2=16)
      Add 4 single-pickup positions (16+4=20)

      I also did some calculating, and the Phase Two wiring + Obsessive-Compulsive Vari-Tone combination I hypothesized previously would have 1,728 different settings! :what:  Take the Phase Two’s 72 pickup settings, multiply by 12 different capacitor settings (72×12=864) and multiply by 2 for inductor on/off (864×2=1728).  I don’t even want to think about the math if you had an O-C Vari-Tone for each pickup!   :cuckoo: 

    • joe

      Well, you clearly have a better mathematical mind for it!

      The Phase 2 version isn’t actually all that hard if you have basic solder skills. As noted before, the trickiest part is making two connection meet at the tiny lugs in the push/pull pot switches.

  • Mika

    That is freaking awesome. I shudder to think what your control cavity looks like! Nicely done, Joe.

    • joe

      Shudder away! I should have included this in the post.

      Actually, the Phase 1 wiring looked a lot worse. The connection pads for the Triple Shots live inside the pickup cavities, so there isn’t too much nasty stuff in the main control cavity. 

      I took this pic before I added the overdrive input cap selector shows in the main post — just mentally add a couple of caps hanging of one of the tone controls, and you’ve got it. 🙂

      • Mika

        Yeah that’s not bad at all. I’m considering the possibilities here. I don’t think I need an onboard distortion but maybe a booster with big muff tone control would be pretty cool…

  • Matt

    Sounds great man!
    I’m new to those Triple Shots, they’re very interesting to me.. By now I have my Les Paul wired up with 50s wiring. I noticed that you have the push/pulls on the volume pots. Just a stupid question: will it work the same for me, having the push/pulls on the tones?

    As I told you I have ’50s wiring on my guitar, and I love how the sound cleans up preserving the highs with the volumes rolled back. Can I get it to sound like that even once I wire it up like you did?

    Thanks 😉 

    • joe

      Well, the main thing you have to know is, you need pickups with four-connector wire, and a lot of vintage pickups — including many of my faves — only have two connectors, though you can always order four-connector versions from the Seymour Duncan Custom Shop.

      You can think of the push/pulls simply as switches attached to pots. What’s attached to the pot doesn’t effect what’s attached to the switches and vice-versa (unless you specifically wire them together). So you could have ANY wiring arrangement that works with four pots, plus four toggle switches on top of that.

      If you’re not especially interested in the phase-reverse and series controls (and your pickups have four-connector cable), you could just add Triple Shots, and have access to 16 solo pickup variations rather than the two you have now, plus all the combined settings, and not even mess with the push/pulls.

      • Matt

        Thank you so much! I’m interested in the out of phase and series tones, so I’ll keep the 2 push pulls. The only thing I’m not interested in is the built-in overdrive, so I guess I don’t need to replace the input jack?

        • joe

          Nope — you only need a pair of Triple Shots and two push/pull pots. Before ordering the latter, make sure to check whether yours are standard length, or the long-format kind used in old Les Pauls, as pictured here. The total for all the parts should be less than fifty bucks. 

          • Matt

            I already have 2 push/pulls with the long shaft, since my LP has the metal plate inside the control cavity. Nice to know it’s gonna be cheaper than I thought 🙂

            Thanks again!.
            Matt 

  • Eric

    Cool stuff. I find it odd that the parallel setting was darker and dirtier than the series connection. Usually it’s the opposite. 

  • Aceman

    Joe, this is fine and all as a test of theory and such, but it is the antithesis of the gear-head mentality.

    I submit for your consideration:

    One guitar with 108 sounds vs 108 guitars with one sound each?

    If my wife ever sees that there can be one guitar with that many sounds consider your @$$ kicked!  :cuss:


  • Oinkus

    That is just too neat I am awestruck and dumbfounded ! My first foray into mods was  a mini switch on my HM Strat  series/parallel . Now it has an extra humbucker , HSH and both are wired series/split/parallel plus the wonderful blend knob option to move the focus. Got to love something like that LP going from hanging on the wall as “The Les Paul you NEEDED to buy” and now its the smoking LP with a ton of really good sounding options !!!

  • Steven

    Very cool!  Thanks for the great article!
    I notice that you have shielded the cavity in your Les Paul. I assume that you did this to reduce the possibility of hum when playing in split coil mode?
     

  • JH

    Page wiring is really cool. I went a step further in my phase 2. Bought the Triple shots for my pickup covers (They are great). Then I swapped out 2 pots, and made 1 master volume and 1 master tone(still debating if that was the best idea or not) w those p/p as master series/parallel and phase reverse. I then installed the artec bcu and the artec exp push pulls. The artec bcu is wonderful. The exp is ok (still trying to find a good use for it)! Both are true bypass.
    Now this is the first time i did this with low output pickups (Sd a2 pros). Surprisingly enough in single coil mode it isn’t a drastic drop like I thought it would be. With the bcu on and the pickups in single coil mode the notes and chords sound crystal clear and chimey! I just wonder how different it would be with hotter pickups? I know the higher and higher you set gain the difference between single/parallel/series gets less and less noticeable.
    I saw the P-rails and its a great idea, but with all the crap off the a2’s have a great sound. Besides I have a lp special copy/beater w p-90’s with gotoh A5 p-90’s. I dont think anyone will ever find a all in one pickup.

  • Moods

    I love it!!! …… more projects to try!

  • Steven

    Joe, I just love the sound of your Paul in the video.
    Regarding the pickups – are you using the Seymour Duncan ’59 Model SH-1′?

    • joe

      Thanks, Steven — that’s exactly what I’m using. Though I’m also digging the way the guitar sounds with a pair of Seth Lovers, which are a little brighter and “honkier” than the ’59s. But with both pickups, I’m floored by how attractive and usable the single-coil sounds are. 🙂

  • CrisR

    Hey there Joe – I’ve looked through the SD-Tone Fiend posts and other stuff (Secret Room, etc) but I’ve not found the breakout for the G-Overdrive circuit that you had in the LP testing out the Pagey 2 run. Any chance I missed that somewhere or could you illuminate the bits that go into that P/P circuit?

    Many thanks!
    CR 

    • joe

      Actually, I never posted a separate piece on adapting the Fiendmaster circuit for mounting inside a guitar. But I think it’s simple enough to explain in a few sentences.

      In the project file (https://www.tonefiend.com/wp-content/uploads/DIY%20Club%20Project%204%20v03.pdf), try working from the basic version shown on pg. 8.

      First off, I very much recommend building it on a breadboard first so you can tune the circuit to taste. Unless you plan to add a knob to your guitar, you’ll probably be building this pg. 8 version without the adjustable input cap used in the final version (unless you do the swtichable two-capacitor version I did, which I’ll explain in a sec).

      Once you have a sound you like, build in a little piece of perfboard. You’ll probably have no trouble making the footprint small enough to fit in the control cavity.

      Anytime you add a battery-powered effect to a guitar, you need to replace the regular mono output jack with a stereo one. The inner and outer lugs are connected as usual, while the third (middle) lug gets connected to the negative terminal of the 9v battery. That way, the battery is removed from the circuit every time you unplug your guitar.

      The other connections are pretty intuitive: the input connects from the last component before you signal goes to the output jack, and the output connects to the hot lug of the output jack. The +9v wire goes to the positive end of the battery, and the negative wire from the circuit board connects to the back of a pot, like all the other ground wires in the circuit. (Remember, the negative terminal of the battery itself does not go to ground, but to that middle lug of the output pot.)

      You may want to add two components from the more “advanced” schematic on page 23: R4, which may nix switch-popping, and C5, which may reduce noise. Or maybe it’ll sound fine without these parts. Try and see.

      In the version I demoed, I omitted C1 from the circuit board, and mounted it on the switch of a push/pull pot, because I already had four of these in the guitar, and the Phase 2 wiring with Triple Shots only required two of these. I added a different capacitor on the other side of the switch, so that pushing/pulling the pot selected between the two. In other words, the wire that would ordinarily feed the distortion input went to the push/pull switch, and the output from the switch connected directly to the circuit board at the junction of R1, R2, and Q1.

      This may be trickier than you want or need. If you play around on the breadboard and find one favorite cap value, you’ll probably be happy with the results. A good all-around value for C1 is 683 or 104 — that’ll give you a big, beefy rock sound. If you specifically want a more piercing, Bluesbreakers-type tone, try a 472 or 103. (I’ve noticed that a lot of players, even ones who love that Bluesbreakers sound, find it a little to shrill for their own guitars.)

      Alternately, you can mount C1 via a socket, and then switch if you don’t like the first cap you try. But in any case, C1 is really the one component that defines the tone and shape of the circuit. It’s worth spending some time on the breadboard figuring out what pleases your ear.

      Hope that helps — let me know how it goes!

      Joe

  • cts

    I use the 59 model on my strat, but its a two conductor, so i can’t use a triple shot on it, is there any mod to get around that
     

  • Chris

    Joe,
    I have an ’81 LP Custom and since I’m a spaz at soldering, I was going to have a shop do the work to split the coils using push/pull pots. Now that I see the Pagey Project, I’m thinking of going a step beyond to the triple shot setup. A few questions: 1) Any thoughts about doing this w/ stock pickups? I can’t afford the whole shebang, so it’s either new pickups, or keep stock ones and tweak tones available, 2) I see there are 2 versions of the triple shot, TS-1 & TS-2 (curved top). I assume the TS-1 is what is needed?, 3) I’ve held off for a LONG TIME because I am a bedroom player – no gigging and don’t have guitar friends – don’t suppose you (or anyone out there) know of any good guitar shops in the Pocono Mtn./Lehigh Valley area of PA?
    I loved the videos! Funny, I had a super-cheap LP copy back in the 70’s (Edison) that the previous owner added an extra switch to. I never knew if he split the coils, reversed the phase or what, but some of the tones you got were real similar to that guitar – tones I still miss when playing my real deal – NEVER should have sold it! 
    Thanks,
    Chris
     

  • joe

    Hi Chris — thanks for your kind words about the site.

    I totally encourage you to learn soldering. No one is a bigger workbench klutz than I am, and I managed to learn. For inspiration, start here

    But this is admittedly one of the trickier wiring jobs, and probably not a great choice for a maiden voyage. 

    My Paul is about the same age as yours, and the original pickups are a bit dark and distorted for my test, so I’m glad I switched to twangier PAF-style models. (I liked the results I got with both ’59s and Seth Lovers). But if you dig how you current pickups sound, use them! The cool thing about this mod is, you lose none of your original tones — you just get new ones.

    But check to see whether your pickups have single connector cable (i.e., a single wire inside a braided shield), or four-connector cable (the cable breaks out into four different-colored wires). If it’s the former, a tricky job become a LOT trickier, and personally, I’d recommend saving up till you can afford a four-connector replacement. Though if you find a competent tech who gives you a good price, it can be done with single-connector.

    Good luck — let us know how it goes! 🙂 

  • Chris

    Joe,
    Wow, a response in less than 1/2 hour! The triple shot seems relatively easy. If I went that way, then after getting some more practice, do you think it would be too difficult to add the push/pull pots at a later date? BTW, I do have the four-connector cable. In the past, I’ve toyed w/ swapping the caps to different values (thanks to an article in the now defunked GuitarOne magazine – my first and only foray into mods, though I did add shielding to my MIM Tele with significant improvement in reducing noise.
     
    Another thought – I have an old Squire Bullet (small Strat body with Tele type headstock) that I’ve played the hell out of and don’t touch much anymore because the pickups pretty much died – futsy, splattering sounds w/ seriously reduced volume. Any project ideas for this beast before I tackle the Les Paul? I wouldn’t shed a tear if I screwed this sucker up.
    Thanks again,
    Chris

    • joe

      Yeah, I lack a life. 😉

      The Bullet would make a great DIY practice guitar!

      One cool thing about Triple Shots: The trickiest wiring happens inside the pickup cavity, not on the pots. Which is just a lot easier ergonomically.

  • Chris

    Joe,
    From my perspective you have a life – one following your muse and doing what you love – good for you! Your videos are quirky, but that’s the fun part, but your enjoyment jumps out making you fun to watch & listen to.
     
    I’m sure I’m not alone, but funds are seriously tight which means I can’t update the pickups in all my guitars (mostly less expensive ones: The Bullet, Ibanez, Artcore AFS75T, Hondo Bass, etc.). Do you – or anyone out there – have any experience w/ some of the “budget” pickups, such as StewMac’s Golden Age, or Guitar Fetish. Are they any good – in other words, worth the money, or should I keep tossing spare change into my jar until I can (finally) afford better pickups? 
     
    Thanks,
    Chris

  • Erik

    I can say a phrase “Good morning” in about 1000 different ways and intonations, however I do not see much value in that, and almost never use these variations. This is a direct analogy with fine sound variations here. Or isn’t it? :stupid: :pacman: :shake: :shiftyeyes: :beer: :ban: :alert: :cuss: :cuckoo: 😡 :spammer:

  • joe

    Good question, actually!

    Now that I’ve worked with the guitar for the better part of a year, I still love the crazy wiring options. But I tend to think if them less as discrete sounds, and more as working with an expanded set of controls. So instead of thinking in terms of “I want variation #37a,” I’m likelier to think, “How would the pickup setting I’m hearing right now sound if it were a little thinner? Or louder Or phase-cancelled?” Then I dick around till it sounds cool. 🙂

  • Ron

    I bought the p-rails and didn’t like them much either, but I am too poor to waste the money.
    I decided to try putting them in upside down and now I love them.

  • magnetmonster

    Hi, Joe!

    It’s 07:25AM here im not so sunny England, and I spent the last few hours completing soldering everything together for my version of your Pagey phase two, the only difference being push/push pots instead push/pullers!

    (I also really liked the possibilities from the black ice, but I haven’t got a passive OD. I’ve tried to get a black ice from a few US webstores, and they either refuse my service or refund my sale!!) Have you a schematic or build guide for the germanium OD you posted above?

    I must say that it was the most awkward soldering I’ve ever done; but then I must state it’s the only soldering I’ve ever done (except for sorting out guitar leads).

    Thankfully it’s all hunky dory!

    It’s still too early for me to crank it up, so all the tonal variations won’t jump out just yet

    Roll on 09:00AM!

    • joe

      Wow — your first wiring project? I’m impressed. This is about as difficult as guitar wiring gets, so you can now consider yourself qualified for ANYTHING!

      The germanium boost inside the guitar is quite similar to the Fiendmaster project on this site. It fits on a very small piece of circuit board, so there’s actually a conceivable chance that it might fit inside your control cavity along with all that other stuff. 🙂

  • magnetmonster

    Thanks!

    But I’m doing the mods in a svelte Epi LP, it’s quite cramped in there at the mo, I’m contemplating putting a cap (clog?) 😉 on the bottom (back, would that be a shoulder pad ;D ), that’d give me a cm or so breathing space.

    I REALLY (did I emphasise that enough) like the look of the Kay Effector fx axe, btu am dismayed by the number of switches, would it be possible to clone the setup, using something like a free-way switch?

    https://www.ebay.co.uk/itm/Free-Way-6-Position-Switch-/281024642306?pt=UK_Guitar_Accessories&hash=item416e5fbd02

    I almost put one in the LP before I decided upon the Pagey 2 plan, and was somewhat apprehensive about such an undertaking.

    Thank heavens I went with the triple shots!

  • magnetmonster

    I’m now considering putting the fuzz on hold temporarily, and instead I’ve ordered a varitone switch.
    (not just to make things even more complicated!)
    (https://www.ebay.co.uk/itm/guitar-or-bass-rotary-switch-6-position-2-pole-custom-tone-varitone-switch-/150951436711?pt=Guitar_Accessories&hash=item23256821a7)

    I’m thinking this won’t be as hard as it appeared the last time I checked the page, am I correct in thinking I’ll ‘just’ be disconnecting one tone (bridge), andusing one tone as control for bridge & neck, with the varitone as capacitor selector?

    It sounds easy when I put it like that. Just gotta find a diagram now!

  • magnetmonster

    Hi, me again…

    I’ve been looking for your notes on which capacitors etc you used for your vari-tone circuit, and can’t seem to locate them, which would you suggest to get a nice tonal range for an LP?

    Thanks in advance!

  • joe

    I’ve used the same switch you link to. It’s better made than the cheapo plastic ones, but be prepared to have to drill a slightly wider hole in your pickguard to accomodate it.

    The best way choose caps is by ear — can you breadboard it and decide what you like best?

    You probably get the most action between values of .01uf and .1uf. Maybe .01uf, .022uF, .047uf, .068 uF, .1uf (small to large)?

  • My undying thanks to you, Sir!

    You (and your site, and members) have been a wealth of help and information to me!

    When this project is finally completed I’ll probably be to confused to know where to start when playing it, (it’s close already!)

    The varitone will alter what’s so far fairly subtle differences into extremely noticable variations in tonal possibilities! 😀

    I’ve also just received some 1n34 germaniums through, so that looks back on track, I’ve never ‘breadboarded’, and have no multimeter, I’m a bit of a fly by night sorta guy, like I stated before, this is my first ever wiring etc. job, but I think I’ll get both for future ease and peace of mind!

    Just noticed, one of the diodes is chipped, I have the fragment, can this be remedied or will I need a new oe?

    • Digital Larry

      mm, not sure if you’re in the US, but Radio Shack (or “Radio Shock” as I saw once on a hand written sign) sells both analog and digital multi meters for $25. The amount of time you will save yourself debugging by learning to use one of these will easily make this expense worthwhile.

      If your diode has a chip in the glass, I would not worry about it too much. It does not need to maintain a vacuum – it’s simply to hold everything together. If it looks like it’s about to break apart, it may be too late, but if not (and you want to feel a little more confident that it won’t break) I’d put a blob of epoxy on it (making sure I could still tell which end has the band marker on it).

      Regarding germanium vs. Schottky, that’s a “taste” question and only you can answer it.

  • https://www.instructables.com/id/Passive-Guitar-Overdrive-Black-Ice/

    This is the system I’m using, but germanium instead of shotky diodes, am I being a noob or is this ok?

    And I’m using said push/push, so will I attach it to the dpdt part, with the regular nodes attached to the varitone?

    Like I said, confuzzling for me!

    • joe

      I can’t explain it technically like Digital Larry can, but…

      …I did experiment with multiple diode types, including germaniums, and the Schottky diodes really did produce the best effect. I just don’t think you’re going to get much cool stuff without them. 🙁

  • OK! I may save them for another project, I’ll test them first, though, alternately, what would happen if I mixed diode types??

  • I might see if I can fit them onto an old Wittner volume pedal I’ve got laying around, if it works, as well as the LP mod, that could give me some extra versatility!

  • Time

    :megaman:

    Hello Joe! I’ve been reading through your pages past and present about the Jimmy Page wiring with the Triple Shots to other interesting topics you seem to have covered.

    I am wondering if the following is possible: taking phase 2 of the Jimmy Page project and adding a vari-tone into the circuit by sacrificing a 2nd tone pot and working with a master tone.

    Also, would it be possible to add in a germanium drive into the 6 or 12 position vari-tone circuit?

    Oh and 50’s wiring too?

    It’s quite a bit to ask, but oh the possibilities!

    • joe

      Thanks! Glad you’re liking the site. 🙂

      Let’s see — yup, should be totally possible to most of that stuff. It would work fine with a master tone, and you could certainly add a Varitone there. I don’t think you can put the boost circuit in the Varitone, though — the tone control is sort of “siphoning off” the main signal, which then proceeds to the output. But if you simply place the booster between the volume knob outputs and the output jack, you should experience a lot of Varitone color in your overdriven sounds.

      Fifties wiring is so simple, it’s ridiculous. You just connect your tone pot and its capacitor (or capacitors, in the case of a Varitone) to the middle lug of the volume control rather than the usual lug 3. It’s a cool thing to know about, but IMHO it’s not that huge a deal, or at least not as huge a deal as you’d imagine given how much ink it gets. You could certainly rig up some switch to toggle between modern and vintage wiring, but my advice is, just try vintage wiring on a guitar or two and see if it does anything for you. I slightly prefer it and usually go that route. But it’s not life-changing! 🙂

  • Time

    :megaman:

    Joe! Thanks for the advice back in January! I combined the 50s wiring and easily with the diagram of phase II.

    At this point, I’m sticking to just Phase II for the time being to get used to the variations already built in – no varitone or anything on the unused tone knobs according to the wire diagram.

    However, I ran into an issue: I was noodling around and found that if I was on only the treble pickup and I pulled the series/parallel switch, it shut off the whole guitar. I double checked my wiring and it was exactly as it was on the diagram – no unintended connections between any contacts.

    Could you shed any light on this matter?

    • The pot-mounted series/parallel switch, in series mode, would want to run the bridge in series through the neck. Just in concept that shouldn’t work. Can you toggle the switch on the neck pickup without it acting as a kill switch?

      • Time

        Hello Bear!

        I can somewhat see your point. To answer your question, with the neck-volume-pot-mounted-series/parallel-switch activated (pulled up), and the 3way toggle set to either Rhythm or Middle, you can hear both pickups activated (after tapping the pole pieces with a screw driver). Moving the 3way the toggle down to Treble silences the guitar, regardless of the triple shot configuration.

        Another thing I have noticed but in reverse is that activating the bridge-volume-pot-mounted-phase-switch (series/parallel is off) on the 3way’s Middle and Treble activates both pickups. Leaving the phase switch up and putting the 3way toggle to Rhythm undoes phase effect and only the regular Rhythm pickup can be heard (in whatever triple shot configuration you had it on).

        At this point, I’ll assume that these anomalies are normal if someone else has arrived to the same point.

  • Jonathan

    I’m amazed by the sound at 2:28 (bridge outer coil). It sounds like a phaser is being used. What is doing that?

  • Alex

    My apologies if i missed it somewhere in the thread above, i did try to go slowly through the whole thing to find my answer but – what kind of push pull volume pots does this require, DPDT’s or something else? I was a littel confused if both volume pots were the same kind just because the 6 dots on the neck pot are noticeably larger than the 6 dots on the bridge pot.

  • Alex

    Thanks so much Joe. I was thrilled to come across your article on this after i figured out what I could do with those Triple Shot rims. I’m dropping a set of Seymour Duncan P Rails into a Samick SG style. With the freed up tone pot real estate I’m trying to figure out how to get a pair of active Artec BCUs or EXP tone controls in there. This is great stuff.

  • joe

    Thanks, Alex. I’m so glad you find it useful. TripleShot is a cool product that more players should know about! 🙂

  • Alex

    Hey Joe,
    I just thought of something – if you have triple shots on both humbuckers, can you do without the 3 way pickup selector switch? I mean, can’t you control the same thing as the 3 way switch as you are with the trip shot toggles?
    If so, I could re-purpose that real estate for some other wonderful little gizmo!

  • Craig

    I’m building an Es175 style hollow body, and I’m planning to wire it with triple shots and two push/pull, two standard pots. (no preamp, for obvious reasons)

    Any thoughts or advice?

    • joe

      Musically, it should be AWESOME. But it can be trickier to wire up components inside a semi-hollow than in a solidbody, just because you have to manipulate everything thorough the f-holes, as opposed to just removing a plate. You can definitely do it, but it may require extra finesse.

  • Craig

    Hi Joe.

    I’m using the original wiring scheme from Duncan that you have linked above. That’s the one that Duncan dropped from their site that has two push pulls and two pots, two triple shots. The idea is to split the coils on the triple shots, have push pull for phase switching and another for series/parallel.

    I got Lindy Fralin Pure PAFs wound a little hot (7.8 and 8.2).

    It’s a little hard to read the diagram. Can you help me with a question?

    I think that the diagram calls for .47 orange drops. Because I was buying humblers, I bought .23 orange drop caps. I am not sure what’s called for (.23 or .47) and because it’s a hollow body, rewiring would be a pain. I’m working on a wiring harness now, and once it’s soldered up, I’ll feed it through, fish the pots through their holes, and screw everything in place. For that reason, I’m interested in getting the wiring right BEFORE I fish it through the f-holes.

    That’s a lot of backstory. Sorry about that.

    The question is, did you use .47 or .23 caps? Any thoughts and/or suggestions on what would work better on a full hollow body guitar (es-175)?

    I’m assuming that .47 will help the singe coil sound better, but may flatten out the tone when I switch to humblers. The .23 may help make the humbler high end sound better, but may make the split coils sound bad.

    Am I on track with this? Any thoughts?

    Thanks in advance.

    Craig

  • Joe Gore

    Hi Craig!

    First, the tone control capacitor value (its number) is important. Its brand and materials are not. (Some folks strongly disagree, but unlike them, I’ve posted audio evidence to back up my opinion: https://www.premierguitar.com/articles/27185-the-recording-guitarist-some-basic-variables. Listen and decide whether you agree.) Orange drops are fine — but so is everything else.

    The value determines how much treble cut you get when you pull the knob all the way back. A .047µ gets bassier than a .022µ, while a .033 splits the difference. The right choice is totally a matter of taste. While you’ve got your guitar on the operating table, why not try all three? If you’re smart enough not to blow money on expensive capacitors, it’ll only cost a few cents, and then you’ll know your preference for all future mods.

  • Dave East

    Hey Joe, (shameless Jimi plug)

    Having searched far and wide for the perfect wiring diagram for my Les Paul, I have found myself fascinated by your posts on the subject. Before arriving here, I had already acquired a set of the Triple Shot pickup rings, four CTS push/pull potentiometers and a slew of various capacitors and such. (The CTS pots are the new style, and I’m still on the fence about whether they are “better” than the traditional layout, but that’s a different subject.)

    Anyway, what I’m looking for is to be able to do the “normal” stuff with the Triple Shots, splitting and series/parallel. I can use two of the push/pull pots to enable series/parallel with regard to the two humbuckers, as well as one to switch in and out of phase between the two humbuckers. I had the thought of using the two remaining push/pull pots as a selector for different tone caps, but I also want to maintain independent volume controls for the pickups. Is that even possible? Maybe a dual gang tone pot?

    • joe

      Hiya, Dave. Nice to “meet” you. Yes, you should be able to do everything you mention. Remember, the switch part of a push-pull pot isn’t connected to the pot part unless you wire it up. So there’s no reason why you couldn’t, say, use a non-tone pot to swap tone pot caps.

  • mat

    Hi. Just thought of an idea for the additional two pushpulls instead of an OD circuit and a different tone cap.
    Why not have a pushpull that changes the phase of one of the coils in the bridge PU and another pushpull that changes the phase of one of the coils in the neck PU?
    This is added to the existing pushpull that switches between overall paralel and series and the other existing pushpull that puts the pickups in and out of phase
    and of course, not to mention the tripple shot rings that allow for all series and paralel combos of the coils of each pickup.
    If you do this, you really do get all possible combinations and permutations of phase and series and paralel with the coils in each PU and overall between the PUs.
    An HB has six possible combinations: inner coil on its own; outer coill on its own; both coils series in phase; both coils series out of phase; both coils paralel in phase; and both coils paralel out of phase. The above idea gives you all of those.
    Two HBs have six overall possible combos: Bridge; neck; bridge and neck series in phase; bridge and neck series out of phase; bridge and neck paralel in phase; and bridge and neck paralel out of phase. The mod gives you all of these also.
    The great thing about this is that everything is individually selectable.
    This idea keeps to the idea of modding the wiring rather than adding additional extras like OD or FUZZ.
    There could be some decision made about which cap is active in the tone control depending on what is selected…
    Any thoughts about this? Has anyone tried it?

  • Mat

    Once I thought of this, I actually wanted to do this on my SG with D allen powerage pickups.
    My SG is one with the small guard and PU rings so it is ready for this kind of mod. But since the SG is a thin body with a flat top, there are a few challenges.
    SD makes trippel shot rings for flat tops – but they are the same size. the SG needs the rings to have angled tops and the bridge ring larger than the neck ring. SD makes those but for aarch tops not flat tops like SGs – AFAIKK.. I would have to probably file down the bottoms of those rings to make them flat.
    Also, I think pushpulls are harder to find that fit in SGs, but I believe they are out there.
    I also want a trebble bleed cap on the vol controls and want the tones to be no-load. But I think finding pushpulls or push-push pots which are no load are very hard to come by, if at all available.
    Has anyone ever tried to do SD tripple shots in an SG?
    I also wonder if, with the idea of changing phase of individual coils, whether the paralel out of phase coils in one PU would be too thin sounding… but it still might be useful.

  • Fred

    Hi Joe I’ve been trying to reach you out, I followed all the instructions and I notice that when my neck push pull is pulled up and I switch to the bridge pickup leaving the neck push/pull still pulled up, it stops the sound of the guitar… Just like a on off switch… Do you know if this is normal or have any idea what’s wrong?
    Thanks

Leave a Reply

You can use these HTML tags

<a href="" title=""> <abbr title=""> <acronym title=""> <b> <blockquote cite=""> <cite> <code> <del datetime=""> <em> <i> <q cite=""> <s> <strike> <strong>


Click to upload a JPG

This site uses Akismet to reduce spam. Learn how your comment data is processed.