
UPDATE [06.16.2013]: Build instructions updated to v02.
The Fuzz Face has inspired countless spinoffs since Ivor Arbiter unveiled the device in 1966. Some introduced meaningful improvements. Many didn’t.
The goal of this project, created by my friend Mitchell “Super-Freq” Hudson, is to create a pedal very similar to the original. It’s a great way to explore one of the iconic sounds of ’60s rock (and lots of ’60s-influenced rock).
The instructions are available here. [19MB PDF.]
You can order a kit from Mammoth for $45. (Disclosure: Neither tonefiend nor super-freq has any financial stake in these kits. I simply asked the Mammoth guys to create one for your parts-sourcing convenience. All necessary parts are readily available from other vendors.)
But before you attempt the project, please be aware of some of its quirks. (And if you’re curious, you can read about how I customized the pedal I used in my video demo.)
Vero board vs. perfboard. This project differs from all previous tonefiend projects in that the circuit is assembled on vero board rather than perfboard. On perfboard, the holes are coated in conductive material, but none of the holes are electronically linked — you must make all connections yourself. On vero board, each row of holes (or column, if rotate the board 90 degrees) is connected by a strip of conductive material.
Each board type has its advantages. Vero board circuits often require less soldering, and you usually don’t have to spend as much time finessing the rat’s nest of wires on the reverse side of the board. However, vero layouts can be tricky to visualize. With pertboard, you can can often just replicate the layout of the schematic. On vero, the layout can have maze-like complexity.
Vero builds are fun, and you should definitely try a few. (I made my first DIY pedals on vero, though I usually use perfboard for prototyping these days.) If you enjoy solving visual puzzles, you’ll definitely have a blast. If that sounds like a nightmare to you, you might prefer a Fuzz Face project that comes with a printed circuit board, such as BYOC’s excellent $95 ESV Vintage Fuzz.

There are no sonic differences between the two approaches. They’re simply two ways of getting to the same place. I happened to make my demo model from perfboard. (Details below.)
Negative ground vs. positive ground. Almost all modern effects use negative-ground wiring. But for the sake of historical accuracy, this build, like many ’60s effects, uses positive ground. It’s not any more difficult to assemble positive-ground circuits — really, the only differences are that polarized parts are inserted in reverse, and the battery’s positive and negative terminals get connected to the circuit board in reverse. But there’s one important consequence: You can’t power the pedal with a conventional power supply. And even if you have a reverse-ground cable and/or power supply, you can’t use any those multi-outlet power supplies that daisy-chain pedals together (unless every other pedal in the chain is positive-ground, and that’s pretty unlikely).
That’s why this kit includes no AC adapter jack. It sucks to burn through batteries for both economic and ecological reasons. But this particular circuit has an extremely low current draw — it’ll run for months and months on a single battery, and will still sound cool as the battery weakens.
No modern conveniences. The project also omits other modern innovations, such as a pull-down resistor on the input (which can minimize switch noise) and a capacitor between +9v and ground (which can prevent high-frequency noise and radio interference). You can certainly add those if you like. But we decided to go minimal. For better or worse, you’ll have an authentic ’60s experience. The sole nod to modern wiring is a true-bypass switch.
Germanium vs. silicon. This is all germanium, baby. Which translates into a warm, thick, dynamic tone. But it’s a loose, sometimes flabby type of distortion, not suitable for modern metal. If you prefer a louder, tighter, brighter sound, you can use silicon. (Mitchell likes silicon 2N3904s in this circuit. Others recommend BC-108s and BC-109s because they appeared in early silicon Fuzz Faces. My opinion: germanium only, unless you have the time, skill, and patience to play with all the values in the circuit to get the best sound from silicon transistors.)
PNP vs. NPN. Since this is a positive-ground circuit, it requires PNP-style transistors. Even though positive-ground hasn’t been used much since the ’60s, you still encounter many new PNP Fuzz Faces, mainly because there’s a much greater supply of vintage PNP transistors. In fact, many germanium pedal projects (including this site’s Fiendmaster, a Rangemaster derivative) use wiring tricks to deploy PNP transistors in modern, negative-ground circuits, just because those transistors have been easier to acquire. But now we’re seeing new-production germanium transistors, such as the ones used in current BYOC kits and sold by parts suppliers such as Mammoth — which means NPNs are suddenly much easier to acquire.
I’ve had great luck with these new-production transistors. And unlike 40+-year-old transistors, you don’t have to go through bags of them to find good ones.
Transistor selection. You’ll find online claims that certain transistor models are essential to get the most out of the circuit. I couldn’t disagree more. After extensive studio experimentation with many transistor types, I’ve concluded that there’s not much sonic difference between properly performing germanium transistors. (Example: I had the opportunity, under exacting studio conditions, the compare the $95 BYOC ESV Fuzz and a $600 British boutique pedal I won’t name that boasts the “definitive” NOS transistors. They two pedals weren’t just similar in sound — they were identical.) However, unlike with most modern components, you can still encounter variation from transistor to transistor, so it may help to audition multiples. (If a newly purchased transistor sounds defective, reputable suppliers will replace it.)
The Mammoth kits includes two AC-128s, the most commonly available PNP transistors. They sound awesome in this circuit.
Other components. Resistor and capacitor values matter, but their composition does not. There’s no harm in using pricy carbon-comp resistors or vintage capacitors for “mojo” or period accuracy, but there are no sonic advantages to doing so. (And I challenge all anyone to provide repeatable audio evidence to the contrary.)
To LED or not to LED. The advantages of an LED are obvious: You can tell whether the thing is on before you start playing! On the other hand, it’s easier to build the pedal without an LED. Omitting it greatly extends battery life. Originals didn’t have LEDs. And hey — I’ve played countless gigs with no-LED fuzzes such as the Z. Vex Fuzz Factory and Prescription Electronics Experience, and somehow survived.
Playing with others. More than any other circuit I can think of, the Fuzz Face performs differently according to the effects you combine it with. It hates buffers — placing a buffer (or buffered effect, such as most Boss or Ibanez pedals) before the Fuzz Face yields a thin, harsh sound. Fuzz Faces almost always sounds best first in the signal chain. Also, they probably shine brightest with vintage-output pickups. (I don’t own any active-pickup guitars, but I suspect the Fuzz Face sounds dreadful with them.) Some say the Fuzz Face works best with single-coils, and the best-known Fuzz Face users are Strat players. But I also dig how it sounds with vintage-style humbuckers. (And remember — the Tone Bender Mk1 is really just a Fuzz Face. So Mk 1 user Mick Ronson, for example, was basically just plugging a Les Paul into a Fuzz Face — to spectacular effect!)
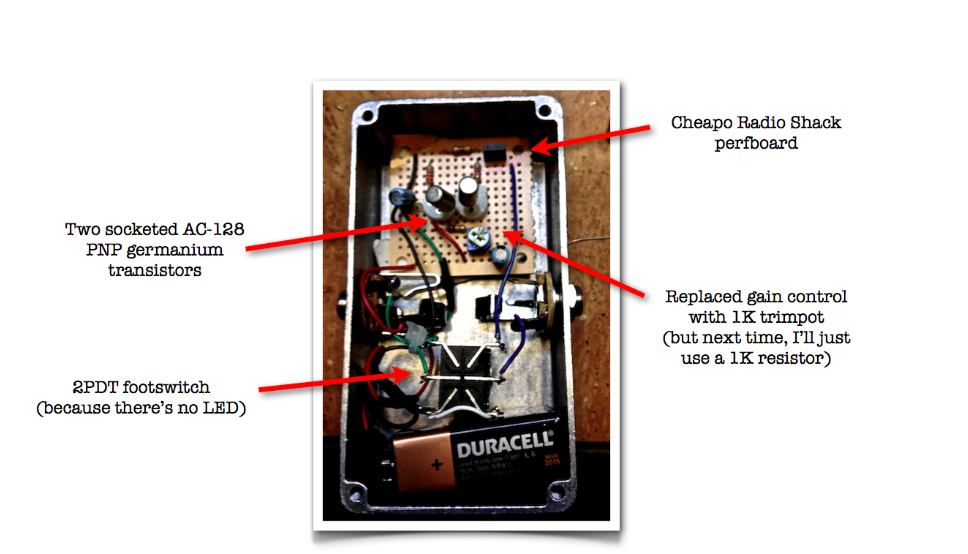
My Fuzz Face build. I built my demo model on perfboard, and simplified it even further. Since I prefer to control the gain from the guitar, I replaced the gain knob with a board-mounted 1k trimpot. (And next time, I’ll just use a 1k or 1.5k resistor.) I also omitted the volume control, because I feel the effect sounds best hitting the amp at maximum level. It’s not a particularly loud fuzz, so I rarely feel a need to tame the level.
Summary. Every adventurous electric guitarist should probably own a good Fuzz Face, and this project is a great way to acquire one. But I only recommend the project if you can get behind its minimalist/retro attitude. If you desire modern circuitry, higher gain, or rare mojo parts, consider alternatives. A vintage Fuzz Face is a wild, often unpredictable effect, best approached with a spirit of adventure and a sense of humor.
Recommended reading:
• R.G. Keen’s 1998 article “The Technology of the Fuzz Face” has inspired countless boutique and DIY Fuzz Faces.
• This Fuzz Central article traces the evolution of the effect and includes great photos of the interiors of vintage units.
Maximum thanks to Mitchell Hudson for creating this project. Do yourself a favor and check out his cool DIY site.
Leave a Reply