For Day 2 of Loopocalypse, here’s an angst-ridden original featuring brutal bit-crushed distortion and Tesla coil samples.
Thunderbeast Park was an Oregon roadside tourist attraction with cheesy plaster dinosaurs. I think I visited here as a kid, though I’m not certain. At least I would have pleaded for us to stop on one of my family’s up-the-coast road trips. I often got my way, ’cause my folks liked this stuff too.
The guitar is my DIY Birdmaster. The pickups are unpotted Duncan/Bonnamassa PAFs — probably the best humbuckers I own.
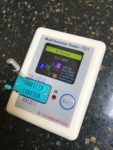
Jon Cusack — the pedal builder, not the actor — recently turned me on to one of the best DIY tools I’ve ever owned: The Multi-Function Tester TC1.
Jon’s Michigan shop manufactures the pedals I design. He and I were trying to pinpoint the optimal gain for the germanium transistors in two of the new pedals I’m about to release.
I’d been using a multimeter to test gain, which is measured in terms of hFE. An old germanium transistor might have hFE of 50 or less, while a hot silicon Darlington transistor such as an MPSA13 might check in at hFE = 5,000. As you can imagine, it’s a crucial measurement for any stompbox that employs transistors.
But like many before me, I encountered two big problems. First, most multimeters don’t have an hFE function. (To make such measurements, the device needs a trio of sockets so you can plug in the transistor’s three legs.) It’s not a matter of cost. In fact, most high-end multimeters, such as the Fluke models whose prices start at well over $100, omit the function. (To be fair, we’re talking about antique transistor technology, which is pretty much extinct in most modern electronics.) You’re likelier to find an hFE tool on cheaper, more obscure models. So I’d been using bunch of cheap-ass Chinese multimeters just to measure hFE.
But there’s another problem: Those multimeter hFE testers are notorious for their inaccuracy. They’re especially prone to overstating the actual gain. They’re not quite useless, but they’re close.
Jon recommended the TC1 ($41.50), which apparently is only available via eBay in the US. And it’s more useful than I could have imagined.
First off, it gives accurate hFE readings within a hundredth of an hFE unit. It works with silicon and germanium BJTs, FETS, JFETS, and MOSFETS. And dig this: It doesn’t matter which way you orient the pins — it knows which leg is which, so no more jumping online to verify the pinout of a particular part.
Check out the photo: The LCD image tells me that the pin in socket 3 is the collector. Had I inserted it the transistor the other way around, the collector would be marked with a 1. Better still, it also works with resistors, capacitors, and diodes. You don’t even have to switch metering functions, as on a multimeter. Just pop in the part, secure it with the clamp, and TC1 does the rest.
Trust me — if you work with transistors, resistors, caps, and diodes, you want this tool. Now I seldom use my crappy multimeter unless I need its continuity (“beeper”) tool.
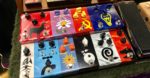
You know what sucks about attending NAMM as a manufacturer rather than a gear writer? I was epoxied to my booth all day, and I barely saw anything other than my guitar pedals. But on one rare break, I got to hang out with Jannis Anastasakis and his crew from JAM Pedals of Athens, Greece. (I highlighted some of their beautiful work in my pathetically skimpy “NAMM report.”)
Happily, there’s more to celebrate here than great visuals. JAM builds lovely versions of many classic analog effects. Their sounds and production quality are stellar, and JAM often adds modern updates such as realtime expression control, extra knobs, and internal trim pots for customizing tones. It’s quality stuff, used by many a guitar star.
And guess what? Jannis loaned me one of his magnificent Custom Shop analog pedalboards. Γαμώτο!
Sadly, I must now pack up and return this pretty pedalboard. But I’ll be getting my own JAM Delay Llama Supreme, an expanded version of the analog delay heard here, with tap tempo, a cool modulation section, and the almighty infinite-hold switch. (I reviewed it for Premier Guitar a few months ago.)
In the meantime, this experience makes me want to try my own DIY pedalboards. Not as an item for sale — just as a way to group related effects in a single enclosure for stage use. Gears are spinning ….
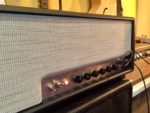
I almost always play small combo amps of 20 watts or less. But I wanted something with a bit more clean headroom for a possible upcoming project — and to demo my stompboxes. I’ve always enjoyed playing JTM-45s when I’ve reviewed them for guitar mags, so I ordered Monotone’s British 45 kit.
I’d previously had a great experience building Mojotone’s Marshall 18 watt clone kit when I reviewed it for Premier Guitar a couple of years ago. It turned out great, and I use it regularly.
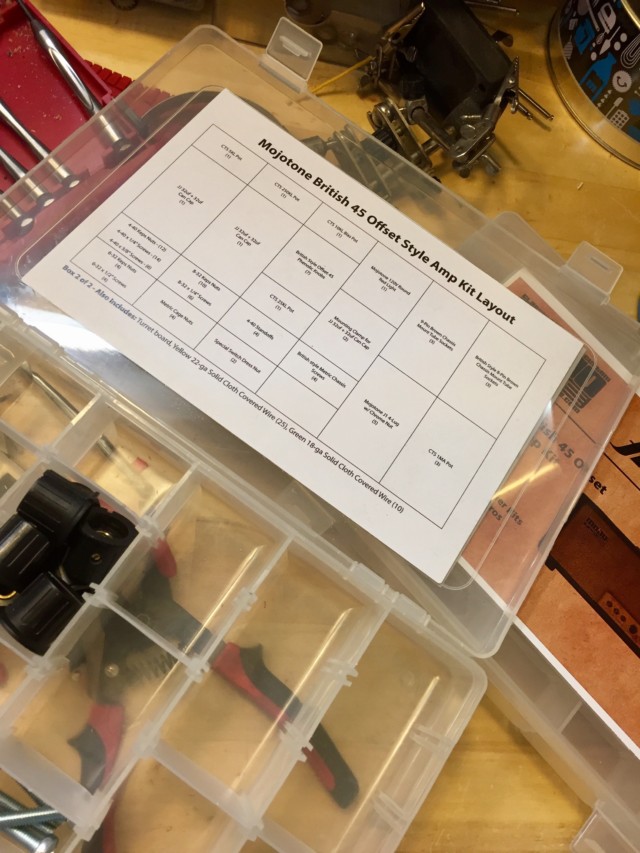
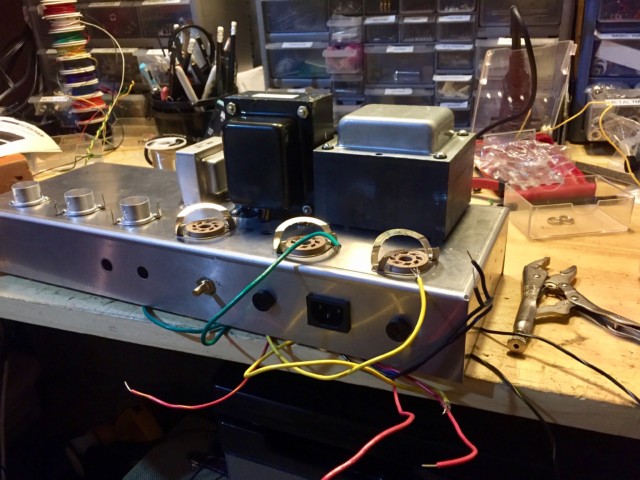
Mojotone provides high quality parts, nearly labelled and organized in plastic compartmented boxes. But beware: The company provides no build instructions — just a layout diagram and a schematic. You need amp building experience or help from an expert. Click play for a slideshow about he build:
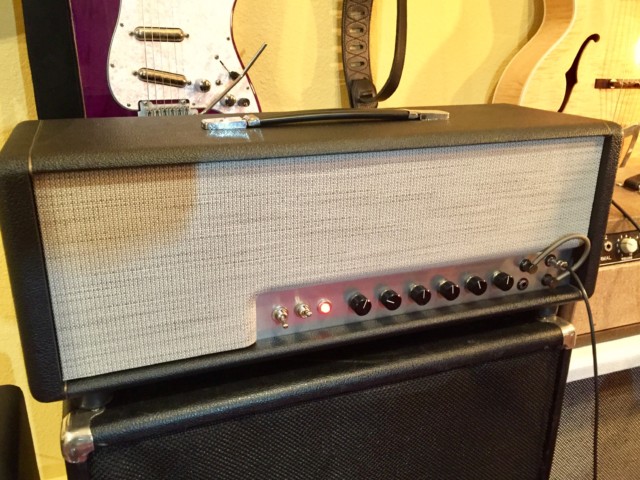
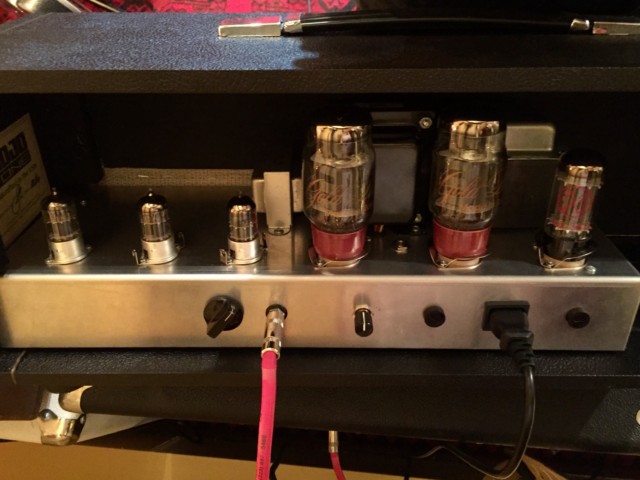
This is Mojotone's new offset head cabinet. (The amp chassis first in other Mojotone cabinets as well.)
The two power tubes can be either EL-34s or KT-66s. (I chose the latter, just for a new experience.)
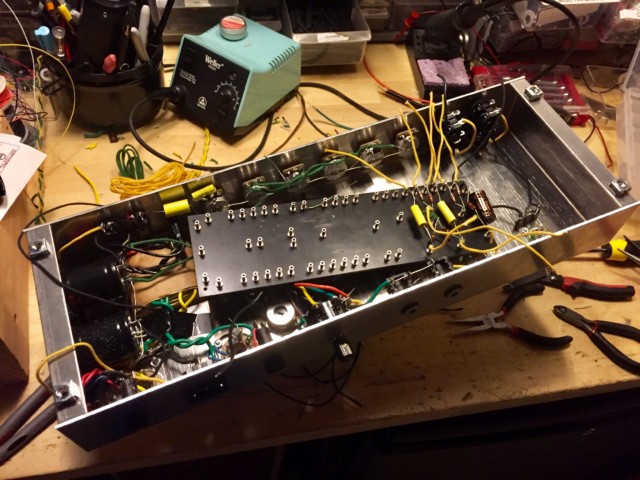
The parts come neatly labeled and organized in plastic bins — a BIG help!
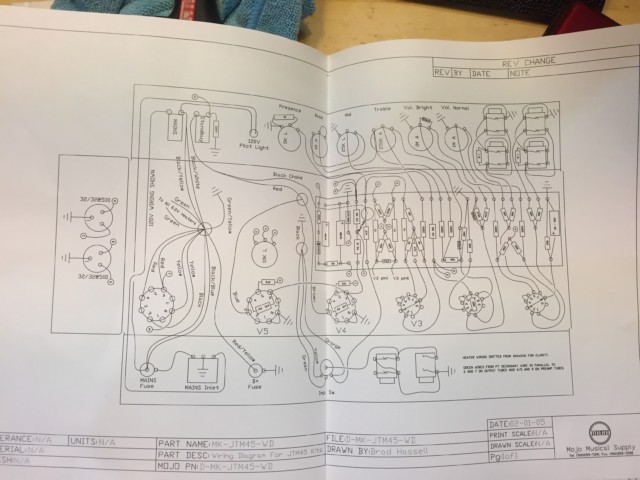
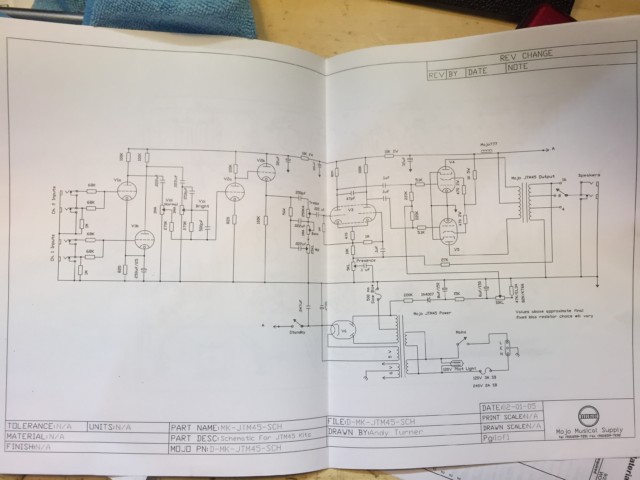
Warning: the kit includes no build instructions — just this layout diagram and a schematic.
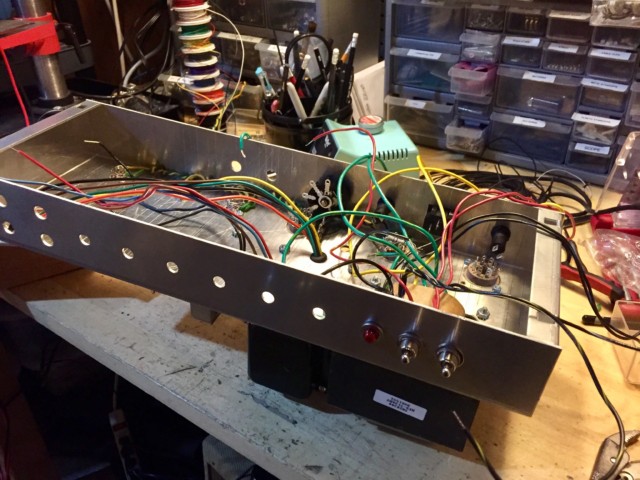
I ALMOST managed to assemble it, but I needed a rescue at the end. (Thanks to Bruce Clement of BC Audio, a brilliant boutique builder here in San Francisco.)
Mojotone supplies their own branded transformers (which sound fab).
It's a turret board build. (The board and turrets are pre-made, as opposed to some kits, which require you to insert the turrets yourself.)
This is probably not a good first build — maybe start with a nice little tweed Champ kit?
The a plexi faceplate, which I left omitted. I also substituted my own knobs.
I nearly made it through myself. (Translation: I soldered everything together and it didn’t work.) So I had to hire Bruce Clement of BC Audio here in San Francisco to rescue me. (Bonus: Bruce loaned me one of his JTX50 heads. Man, it’s one of the best-sounding Marshall derivatives I’ve ever heard. It’s among his Octal-Plex series amps, which use octal preamp tubes in Marshall-inspired designs.)
As threatened, here’s a closer look at Strat with PAF humbuckers used for my recent “God Only Knows” cover. Most parts are from the long-suffering guitar used for all the Mongrel Strat Project experiments. And this one is especially mongrel-ific, with its blend of vintage Fender and Gibson.
Obviously, Gibson pickups is a Strat is far from a new idea. But usually, that arranged marriage is designed to spawn macho, high-gain solos minus the characteristic shrillness of vintage Strat bridge pickups. While many players I love have used humbucker-equipped Strats, I’ve always loathed playing them myself. But what, I wondered, if you didn’t use a hot humbucker, but an über-vintage PAF?
Like many players my age and younger, I was astonished when I first encountered a vintage-voiced humbucker. It was nothing like the dark, over-overdriven tones I associated with the word humbucker. A good PAF is sparkly, resonant, and perfectly capable of gloriously bright and clean tones. Here I used a Seymour Duncan Joe Bonamassa signature set, the same one heard in a more Gibson-like context here.
The results are … compelling. As expected, notes have far more mass than on a conventional Strat, and the bass response is vastly increased. There’s no shortage of top-end either, though the big lows can overwhelm the highs at times. So while I’m pretty much always obsessed with bass-cut controls (especially the high-pass section of the PTB circuit I’ve written about approximately 37 zillion times), it’s especially invaluable in this case. Since lows disproportionately drive distortion, even modest bass cuts clean up the tone and make highs speak more clearly.
I’ve also incorporated the dual-capacitor treble control I wrote about here. It creates a Vari-Tone/ToneStyler effect in a simplified way: Instead of using a clunky rotary switch to choose from a large set of treble-trimming capacitors, it fades between a large cap and a small cap, yielding the same resonant effect as the more complex options. I’ve incorporated this circuit in several guitars now, and it’s still working for me. It’s especially nice here, when paired with a Steinberger JackPot potentiometer, which lets you bypass the entire tone circuit for absolute maximum volume and brightness. I chose the small cap based on the minimum amount I’d ever want to remove from the signal, and the larger one based on the maximum cut I’d use.
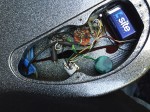
I would have included a photo of the project in progress, but I didn’t because I’m embarrassed about how awful it looks inside. I needed to route out the pickup cavities to accommodate these larger pickups. But instead of taking it to a professional, or getting a proper router and learning how to use it, I chipped away with the tiny routing bit on an inexpensive Dremel tool. Do yourself a favor, kids, and don’t follow my lazy-ass example.
But hey, what’s a Strat pickguard for if not to conceal your shoddy workmanship? The guitar looks okay in the end, and I’m digging its sounds, even though it was far harder to get accustomed to than I’d anticipated. I had to recalibrate my right-hand dynamics to prevent treble notes from screeching. I was almost ready to chalk this up as a failed experiment, but after a few days of noodling around, I started to get the hang of it and enjoy the results. I think I’ll keep it this way for a while — or at least until the next Mongrel Strat concept wafts up from the bowels of Hell. 🙂
Okay, it’s not the ultimate lipstick-tube guitar for everybody, but it probably is for me. It’s my third lipstick-tube pickup experiment — and definitely my favorite.
You may have heard some of these parts before: I used the neck for all my Mongrel Strat projects, and the Strat-sized Seymour Duncan pickups appeared in my previous lipstick-tube experiments. (I love Duncan’s lipstick-tubes. To my ear, they sound way better than the ones in new-school Danelectros.) The new body is Warmoth’s Hybrid Tele model, in purple with butterfly stickers. It’s très macho. (Better not use if for gigs in Indiana and Arkansas.)
My previous lipstick tube experiments used a MIM Strat body, but I wanted something a little more distinctive, and with a built-in battery compartment (because nothing is a bigger pain than changing batteries in a traditional Strat control cavity). Also, I like how the design evokes both Strat and Tele, since the guitar has three-Strat sized pickups and a whammy, but is wired more like a Tele.
About that wiring: The 3-way pickup selector chooses neck, bridge or both pickups, like on a Tele. Meanwhile, a SPDT switch toggles the middle pickup on and off regardless of the pickup selector, so you get six settings: neck, bridge, neck + bridge, neck + middle, bridge + middle, and all at once. It’s a pragmatic variation on “Nashville Tele” wiring with a switch rather than a pot. That means you can’t dial in varying amounts of middle pickup—it’s all or nothing. But on the plus side, I can jump instantly to an out-of-phase sound from any pickup-selector setting, and it freed up space for the other weird crap I put in this guitar. (Yo, electrical engineers: Don’t bother telling me that combined-pickup settings aren’t really out-of-phase True, they’re not out-of-phase electronically, but they are acoustically, and the distinctive “hollow” sound of combined settings is precisely the result of phase cancellation from two pickups at different positions.)
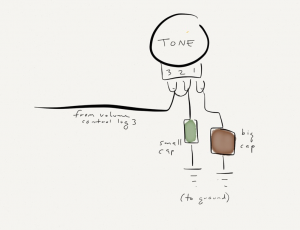
The weirdest detail is what I call a “cap-fade” tone control. It’s an idea I speculated about back in January, and to which many of you contributed cool perspectives. I pretty much followed the scheme in the original diagram:
The idea again: Instead of sending varying amounts of signal to ground via a tone cap, the pot here fades between a small-value cap (which defines the minimum cut when the control is engaged) and a larger one (defining the frequency of the maximum cut). In other words, instead of sending varying amounts of signal to ground, this circuit always sends everything above the cutoff frequency to ground, with the pot determining the frequency.
Hey, smart people — let me get your take on this. I’ve been playing with a new tone control idea that’s so simple, I can’t believe no one’s done it before. (Chances are someone has.)
Here’s the idea: Conventional electric guitar tone controls employ a single pot and single capacitor connected to ground. As you turn the pot, more signal goes to ground for a darker sound. The capacitor value determines the cutoff frequency — the larger the cap, the lower the cutoff frequency and the darker the sound. In other words, the cutoff frequency is fixed, but the percentage of signal that gets cut off changes as you move the pot.
Meanwhile, the Gibson Vari-Tone circuit uses a rotary switch rather than a pot, and a set of capacitors of ascending size. The small caps have a brighter tone, and the large ones sound darker. But once a cap is engaged, it’s engaged all the way. In other words, the cutoff frequency varies as you move the switch, but not the percentage of affected signal—it’s always 100%. (The Stellartone ToneStyler employs the same concept, with as many as 16 caps arranged around a rotary switch.)
But do you really need all those caps? Why not use the tone pot to fade between a small cap and a large one, like so:
Here, the brighter/lower-value cap is engaged when the pot’s all the way up. As you roll it back, the larger cap is introduced, producing greater capacitance and a deeper treble cut. When you arrange caps in parallel, their total capacitance is the sum of their values. For example, I tried a .0047µF cap and a .047µF, so the minimum value is .0047µF (a very modest cut) and the maximum is approximately .052µF (a very dark tone).
So far I’ve only tried this on breadboard, though I plan to deploy it in a new “parts” guitar I’m assembling. So far it sounds … really good. A lot like a ToneStyler, actually, but with fewer parts and handpicked values. The only tricky thing was finding a good pot value where all the action wasn’t bunched up at one end of the knob’s range. A reverse-log pot worked best for me—I got nice results with both a C500K and C1M.
I often use similar wiring to alter the value of the input cap on distortion pedals. (High values filter our more bass for a brighter/cleaner sound.) But I’m not aware of anyone having tried this on a guitar tone control.
Another issue is the fact that, in this circuit, the tone pot always has a cap engaged. You could use a really tiny value for the smaller cap so there’s little perceptible cut at the minimum setting, but that can make a substantial part of the pot’s range a little too subtle. So my plan is to combine this with a Ned Steinberger-designed JackPot as the volume control. This part has an “off” setting that bypasses the tone circuit entirely for a maximum-bright sound. That way, I’d choose for the smaller cap a value that provides the minimum treble cut I’m likely to want. (I suspect I’ll wind up with something between .0022µF and .0047µF.)
Have any of you seen or heard of such a guitar circuit? If so, any observations or advice?
Awesome as it is, a double Varitone is unlikely to improve your sex life.
I was kind of stoked about my latest wiring experiment: a “double Varitone” scheme I installed in my DIY “Kitschcaster.” I’ve written about these multi-capacitor tone switches a lot on this site, but this is the first time I’ve tried using a similar scheme to cut bass frequencies. The result is a lot like the G&Ls “PTB” circuit (covered here and at Premier Guitar), but with adjustable treble-cut and adjustable bass-cut.
The reason I say I was kind of stoked is, just as I was preparing this post, some fascinating marketing materials appeared in my comments queue. A manufacturer uploaded a barrage of marketing copy about his product, a prefab pickup-switching system. I visited the product site, and learned the most amazing thing: Unlike most of the stuff I write about here, his product can actually get you laid! No way can the double Varitone do that! Here’s how the product works:
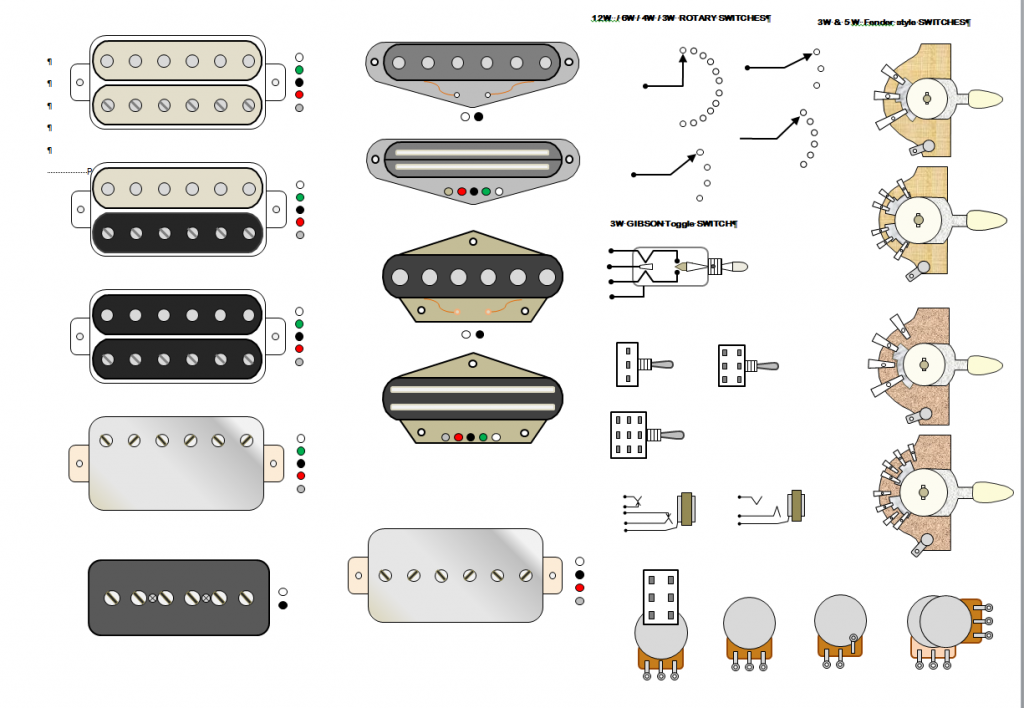
Check it out! Reader Mike Taylor tried to share this cool wiring diagram worksheet in the forum, but sadly, my meager WordPress forum plug-in doesn’t support uploads. It’s so handy and nicely done that I present it here. (Right-click to download.)
It’s an MS Word file, with the graphic elements for pickup wiring diagrams embedded as selectable objects. Mike has included all the most popular components, plus some not-so-popular ones of the sort we like to obsess on here. I’m totally going to use this to create future wiring diagrams for the site and elsewhere.
Some notes from Mike:
It can be used to start laying out wiring diagrams by drawing interconnections in Word, or I guess you could just position the building blocks on a page, print it out, and hand draw the connections. The little dots next to the representations of pickups can be changed to match the colour codes of your pickups. All objects are just simple shapes grouped together and set so they preserve their aspect ratios. Hopefully, shrinking and enlarging shouldn’t be too problematic. Anyone can change or add to it, as it’s unprotected. If anyone finds it useful, I hope they do their own thing with it.
Thanks, Mike! :beer:
Anyone else got cool resources like this to share? Don’t be shy — stand and deliver!
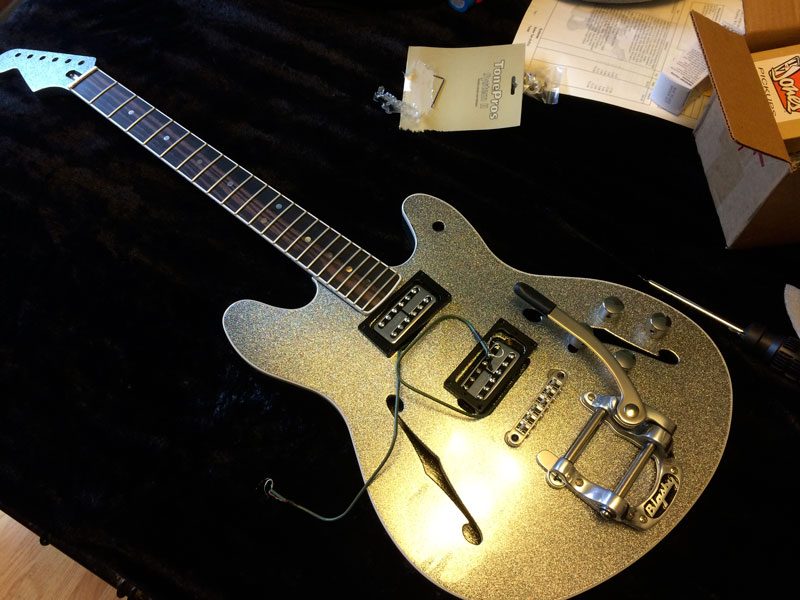
Look what UPS left on my porch: the neck and body for my latest ill-advised “parts” guitar project. I’ll be slapping it together in the coming days, but I couldn’t resist showing off the pretty parts. The body is Warmoth’s Mooncaster model, which is based on Fender’s semi-hollowbody Starcaster, a quirky cult guitar if ever there was one. But for the neck, I swiped an idea from Warmoth’s Josh Spataro, and substituted a reverse angled Strat neck. The tacky silver finish and extravagant binding are solely the result of my bad taste. (Josh compared it to a pinky ring, which is pretty accurate.) The body is korina, the neck mahogany.
If my last Warmoth parts guitar was a sort of Fender/Gibson hybrid, this one is more Fender/Gretsch. I’m planning to install a set of TV Jones pickups, and this will be my chance to try out a very different type of tone control scheme, one I’ve been thinking about for a while. If it turns out well, I’ll write about it. If not, I’ll probably delete the last few sentences and deny they ever existed.
This is my third Warmoth parts project since starting this blog. As before, I’m 100% delighted with the materials and build quality. Since I requested expensive options (like the vulgarly bound and finished neck) and I’m using fancy parts, the guitar probably won’t be vastly cheaper than if I’d bought it already made. But it should be unique and fun. Stay tuned — and I’ll hope the guitar does too.