
Sometimes only the threat of public exposure can inspire a proper clean-up job. Case in point: I hadn’t groomed my battered ’63 Strat in years, and when I pupped it from the wall for my recent post on the instrument, the fact that I was about to show it to the world you guys made me finally admit how gross it had become.
Now, it’s not like I wanted it to sparkle or anything — seems to me that an old guitar should look old, and removing 100% of the grime would be a little too much like those octogenarians with preternaturally white teeth. I mainly just wanted to remove the sticky crud that had accu
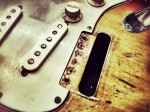
mulated at every spot where the guitar comes in contact with skin, especially on the fretboard and around the cutaways. I also used the opportunity to reinstall some of the guitar’s original hardware, which I’d replaced with “improved” parts sometime during the last ice age ’80s.
First, credit where it’s due: Most of what I did was based on the wisdom of my former Guitar Player mag colleague Dan Erliwine, who’s always right about everything. If you have any interest in maintaining or modding your own instruments, you must acquire his The Guitar Player Repair Guide and How to Make Your Electric Guitar Play Great, like, yesterday. I keep both on my workbench iPad.

Since I wanted to reinstate the original bridge and bridge block, I started by removing the strings, bridge, and trem assembly. Amazingly, I located the original parts, which were pitted and rusty. I soaked them overnight in a jar of naptha, a petroleum-based solvent that’s pretty much the same thing as lighter fluid. (It’s fairly nasty stuff, so the usual skin/eye protection and ventilation rules apply.) Following Dan E.’s advice, I added a few drops of 3-in-1-style lubricant. The toxic bath didn’t make the parts look new, but it worked loose most of the crud and some of the rust. (If I were less lazy, I might also have soaked the knobs and selector switch in a cup of warm water with some dishwashing detergent added.)
Next, I started on the body, seeing how much of the grime would come off with a soft cloth dampened with warm water. The answer: almost none. The experts urge caution in applying solvents to old finishes, but some escalation was necessary. So I dipped poured a bit of naphta into a soft rag, and then flapped the rag around till most of the fluid had evaporated.
This was much more effective. And anyway, the original sunburst finish was so badly worn that I hardly minded when all the old orange and red paint peeled away, exposing the bare wood beneath. JUST KIDDING! This light naptha rub-down caused no new damage, and after a few minutes of work, the guitar no longer looked like it had stashed behind a deep-fryer for a decade.

The fretboard was a tougher chore. There was hard-packed grime parallel to the strings and against the frets. I used to rely on the time-honored technique of 0000 steel wool dipped in warm water with a touch of dishwashing liquid, followed by a light coat of linseed oil. But I’m a recent convent to Gorgomyte Fret Conditioning Cloth, a pre-lubricated cloth that cleans and conditions remarkably well. It’s ten bucks a package, but a two-inch swatch generally does the job, so you can usually get eight or so cleanings from a single purchase.
But this wasn’t your average clean-up job. I wound up turning to another Erliwine-approved technique: very carefully scraping the frets, squeegee-style, with the edge of a metal rule. The loosened almost all of the grime, and a second Gorgomyte application finished the job. The fingerboard felt great, and the frets were now clean and shiny. I also used the cloth to remove a bit more crud from the back of the neck and headstock.
(Note that these are good techniques for a rosewood fingerboard like mine, but if you’re working on a maple fingerboard with an old-school finish, you should avoid any abrasives, and use only water and/or naptha — even mild scraping can leave permanent marks, as I learned for myself while building this mutant Strat. I should have reviewed Dan’s books first….)
Setup was simple, since for now I just wanted to batten down the bridge and set the intonation and action. These days, I make all such adjustments chiefly by ear and feel. I restring, and then start with the intonation, using the harmonics method: a harmonic played at the 12th or 19th fret should be the exact same pitch as the fretted notes at the same location. The harmonics, by definition, and in tune — you just need to slide the saddles back and forth till the fretted notes match. (If the fretted note is higher than the harmonic, the saddle is too close to the nut, and you need to tighten the screw to add a tiny bit of string length, resulting in a lower fretted pitch.) You can use a tuner if you don’t trust your ear.

I also took Dan’s advice and used a fret radius gauge to set the relative string height. And as usual, this method didn’t work for me, though your mileage may vary. Even when I don’t play with a detuned sixth string (and I usually do), I tend to favor higher action on the low strings. (My fifth and sixth strings often wind up at parellel height to the fourth string, as opposed to sloping down slightly to mirror the radius of the neck.) So as usual, I wound up alternating between playing and sighting down the neck, making back-and-forth adjustments until everything felt good to me.
And that did it — now I had an attractively dirty guitar rather than a disgustingly dirty one! You can see the results here.
And how about you guys? Have any favorite cleaning and conditioning tips? Especially for those super-gross clean-up jobs? Please share!
Leave a Reply