Categories
guitar

The PAF Strat

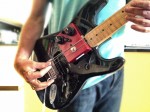
As threatened, here’s a closer look at Strat with PAF humbuckers used for my recent “God Only Knows” cover. Most parts are from the long-suffering guitar used for all the Mongrel Strat Project experiments. And this one is especially mongrel-ific, with its blend of vintage Fender and Gibson.

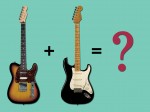
Obviously, Gibson pickups is a Strat is far from a new idea. But usually, that arranged marriage is designed to spawn macho, high-gain solos minus the characteristic shrillness of vintage Strat bridge pickups. While many players I love have used humbucker-equipped Strats, I’ve always loathed playing them myself. But what, I wondered, if you didn’t use a hot humbucker, but an über-vintage PAF?

Like many players my age and younger, I was astonished when I first encountered a vintage-voiced humbucker. It was nothing like the dark, over-overdriven tones I associated with the word humbucker. A good PAF is sparkly, resonant, and perfectly capable of gloriously bright and clean tones. Here I used a Seymour Duncan Joe Bonamassa signature set, the same one heard in a more Gibson-like context here.

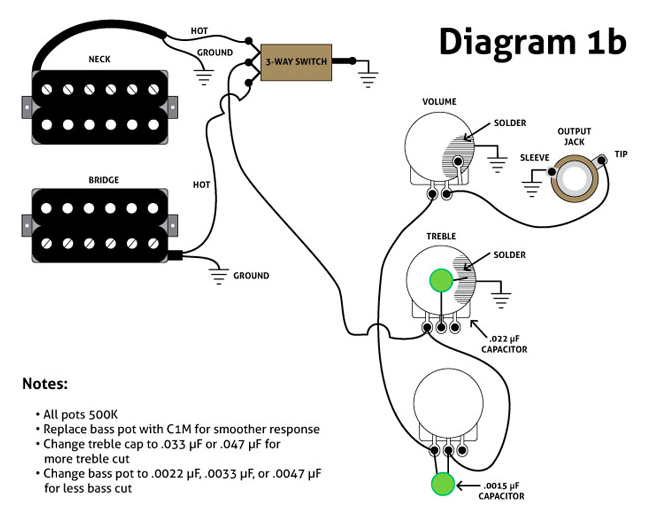
The results are … compelling. As expected, notes have far more mass than on a conventional Strat, and the bass response is vastly increased. There’s no shortage of top-end either, though the big lows can overwhelm the highs at times. So while I’m pretty much always obsessed with bass-cut controls (especially the high-pass section of the PTB circuit I’ve written about approximately 37 zillion times), it’s especially invaluable in this case. Since lows disproportionately drive distortion, even modest bass cuts clean up the tone and make highs speak more clearly.

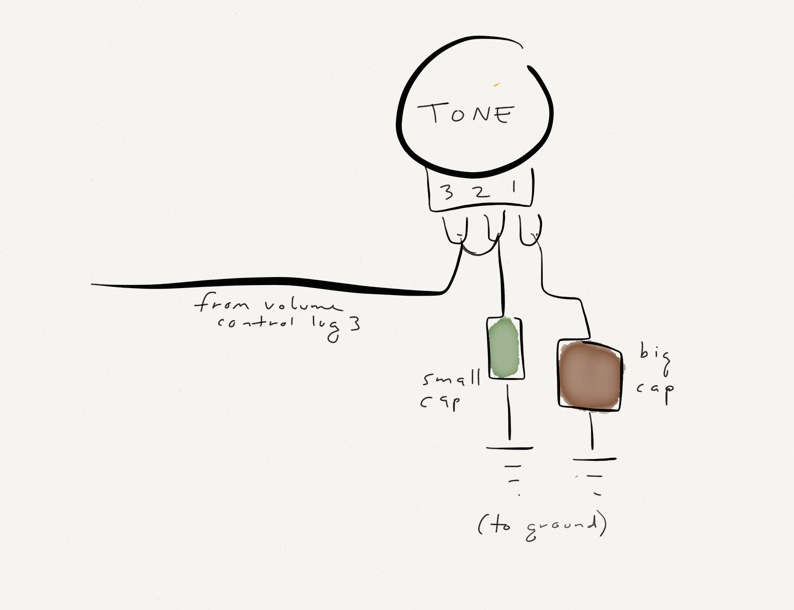
I’ve also incorporated the dual-capacitor treble control I wrote about here. It creates a Vari-Tone/ToneStyler effect in a simplified way: Instead of using a clunky rotary switch to choose from a large set of treble-trimming capacitors, it fades between a large cap and a small cap, yielding the same resonant effect as the more complex options. I’ve incorporated this circuit in several guitars now, and it’s still working for me. It’s especially nice here, when paired with a Steinberger JackPot potentiometer, which lets you bypass the entire tone circuit for absolute maximum volume and brightness. I chose the small cap based on the minimum amount I’d ever want to remove from the signal, and the larger one based on the maximum cut I’d use.

I would have included a photo of the project in progress, but I didn’t because I’m embarrassed about how awful it looks inside. I needed to route out the pickup cavities to accommodate these larger pickups. But instead of taking it to a professional, or getting a proper router and learning how to use it, I chipped away with the tiny routing bit on an inexpensive Dremel tool. Do yourself a favor, kids, and don’t follow my lazy-ass example.

But hey, what’s a Strat pickguard for if not to conceal your shoddy workmanship? The guitar looks okay in the end, and I’m digging its sounds, even though it was far harder to get accustomed to than I’d anticipated. I had to recalibrate my right-hand dynamics to prevent treble notes from screeching. I was almost ready to chalk this up as a failed experiment, but after a few days of noodling around, I started to get the hang of it and enjoy the results. I think I’ll keep it this way for a while — or at least until the next Mongrel Strat concept wafts up from the bowels of Hell. 🙂

Categories
DIY

A New Tone Control Concept — or Is It?

Hey, smart people — let me get your take on this. I’ve been playing with a new tone control idea that’s so simple, I can’t believe no one’s done it before. (Chances are someone has.)

Here’s the idea: Conventional electric guitar tone controls employ a single pot and single capacitor connected to ground. As you turn the pot, more signal goes to ground for a darker sound. The capacitor value determines the cutoff frequency — the larger the cap, the lower the cutoff frequency and the darker the sound. In other words, the cutoff frequency is fixed, but the percentage of signal that gets cut off changes as you move the pot.

Meanwhile, the Gibson Vari-Tone circuit uses a rotary switch rather than a pot, and a set of capacitors of ascending size. The small caps have a brighter tone, and the large ones sound darker. But once a cap is engaged, it’s engaged all the way. In other words, the cutoff frequency varies as you move the switch, but not the percentage of affected signal—it’s always 100%.  (The Stellartone ToneStyler employs the same concept, with as many as 16 caps arranged around a rotary switch.)

But do you really need all those caps? Why not use the tone pot to fade between a small cap and a large one, like so:

double cap

Here, the brighter/lower-value cap is engaged when the pot’s all the way up. As you roll it back, the larger cap is introduced, producing greater capacitance and a deeper treble cut. When you arrange caps in parallel, their total capacitance is the sum of their values. For example, I tried a .0047µF cap and a .047µF, so the minimum value is .0047µF (a very modest cut) and the maximum is approximately .052µF (a very dark tone).

So far I’ve only tried this on breadboard, though I plan to deploy it in a new “parts” guitar I’m assembling. So far it sounds … really good. A lot like a ToneStyler, actually, but with fewer parts and handpicked values. The only tricky thing was finding a good pot value where all the action wasn’t bunched up at one end of the knob’s range. A reverse-log pot worked best for me—I got nice results with both a C500K and C1M.

I often use similar wiring to alter the value of the input cap on distortion pedals. (High values filter our more bass for a brighter/cleaner sound.) But I’m not aware of anyone having tried this on a guitar tone control.

Another issue is the fact that, in this circuit, the tone pot always has a cap engaged. You could use a really tiny value for the smaller cap so there’s little perceptible cut at the minimum setting, but that can make a substantial part of the pot’s range a little too subtle. So my plan is to combine this with a Ned Steinberger-designed JackPot as the volume control. This part has an “off” setting that bypasses the tone circuit entirely for a maximum-bright sound. That way, I’d choose for the smaller cap a value that provides the minimum treble cut I’m likely to want. (I suspect I’ll wind up with something between .0022µF and .0047µF.)

Have any of you seen or heard of such a guitar circuit? If so, any observations or advice?


Categories
DIY guitar

My Top Three Wiring Mods

Premier Guitar just posted my new article on three favorite electric guitar wiring mods. The concepts won’t be new to anyone who hangs out here — I’ve pretty much flogged them all to death! But the new article includes the step-by-step walkthroughs that I never got around to creating for this site, and PG art director Meghan Molumby created beautifully clear tech diagrams like this one:


Screen Shot 2014-07-23 at 9.54.35 AM

The descriptions and instructions in the new story are clearer and more detailed than my original posts here, plus I’ve refined some details, so I suggest working from the new PG versions.

My three choices:

Yup, the ol’ PTB tone control, the coolest mod I know, at least for players who love distortion. The new version of the project uses the 500K pots you probably already have in your guitar rather than the more eccentric G&L values.

I also revisited the Strat version of the “Nashville-style” Tele wiring popularized by Brent Mason and other Music City cats. It performs brilliantly in a Strat, and IMHO its benefits (vastly more blended-pickup options plus a musical and intuitive control layout) for outweigh the costs (loss of the middle-pickup-alone setting, cost of a 3-way switch). Not to launch a protracted Strat-vs.-Tele battle, but I love the whole notion of “Tele-fying” a Strat via wiring, control layout, and pickup choice.

In the article’s comments thread, several savvy readers also mention Strat wiring systems that provide the sounds of the Nashville mod without sacrificing any others. They’re right — but the more I mess with this stuff, the more I value simplified operation. I’m less concerned with having all options than with having the coolest ones, ergonomically organized. Still, there are many ways you can go here.

Finally, I’m once more beating the dead Varitone horse exploring variations on Gibson’s Varitone concept, updated for modern players. I added a new twist in the PG story: deploying these ideas via toggle switches, rather than a big, clunky rotary switch.

It was fun when PG editor Shawn Hammond asked me to choose my favorite mods. It was easy to decide though — these are the three I keep coming back to, and all three deliver dramatic results, unlike many better-known mods.

So which electric guitar mods would be on your short list? Wiring, hardware, whatever. How do you make your guitars cooler?

Categories
DIY Effects guitar

The Lipstick Lab
New Experiments with Old Pickups

Do you ever get an idea that you just know is going to work out brilliantly? And then discover you were totally wrong?

That’s how it was when I finally reassembled my generic Mexican Strat with Duncan lipstick tube pickups. After I recorded a demoing of it here almost two years ago, the guitar lay in pieces alongside my workbench. I’d stare at decapitated body, feeling guilty and dreaming of all the fantastic mods I’d attempt when I finally got around to reanimating it. I had various ideas for the tone control: Maybe a two-band PTB control? Nope—totally underwhelming results. Perhaps a two-in-one TBX? Meh—even less interesting. I drew a blank, and the guitar wound up with a disappointingly normal tone circuit.

But I did discover some cool twists along the way. Details after the video:

My flatwound string addiction is only getting worse, but this is the first time I’ve combined flats and lipstick tubes. (Has anyone done that since the ’50s?) The results were fascinating. As happens when you put flats on an electric 12-string, you encounter a paradoxical increase in highs, despite the darker-toned bass strings. (Maybe it’s because the treble strings ring truer with less phase-canceling interference from roundwound bass strings.) As you can hear, this instrument doesn’t lack for zing.

The opposite, actually — treble notes explode from the instrument, often more than you’d like. I experimented with various action and pickup height adjustments, but no matter how I set things, it was difficult preventing certain notes from shrieking. The only solution was to play the damn guitar for a few hours and grow accustomed to the touch.

Categories
DIY Effects guitar

The Fuzz of a Thousand Faces

Lon Chaney was reportedly an early user of the Fuzz Face.
Lon Chaney was an early Fuzz Face user.

It is a truth universally acknowledged that a guitarist in possession of a single Face Fuzz must be in want of cool Fuzz Face mods. (Sorry, Jane.)

Case in point: The comments section for the new Fuzz Face project.

We’re far from the first to cover this ground. In fact, I should have mentioned a couple of great articles on Fuzz Face mods. We’ve talked about the technique of using sockets in your build so you can audition multiple components. Years ago DIYer Gary Burchett took this notion to its logical conclusion with the Multi-Face, a Fuzz Face with most of the components socketed. It’s definitely worth trying this. Meanwhile, this Instructables project by randofo explains how to create a super-versatile Fuzz Face using switchable components.

Trust me — despite the simplicity of the circuit and the sheer number of adventurous souls who have deconstructed and reconstructed it, it’s hard not to play around with it and find something cool and new. That too is a truth universally acknowledged!

Categories
DIY guitar Music Pickups

The Great Epiphone Swindle

You don’t have to spend $6,706 to sound like a punk. And don’t ask what the six cents are for!

My pal Linda B. is a killer rock and roll drummer who also plays a pretty mean guitar. She’s decided to form an all-female Sex Pistols cover band, with her assuming the duties of guitarist Steve Jones.

An avid rock historian, Linda did her research, which quickly led her to Gibson’s limited edition Steve Jones signature model Les Paul Custom, a slavishly accurate replica of Steve’s iconic axe.

(The original, which had previously belonged to New York Doll Sylvain Sylvain, was not used on the Sex Pistols’ early singles or the Never Mind the Bollocks album, but was his main stage instrument.)

Just one problem: the $6,706 price tag.

So Linda bought a used white Epiphone Les Paul Custom for $299, ordered the same pickups that are in the original and the signature model (a Gibson 498T “Hot Alnico” humbucker in the bridge position, and a 496R “Hot Ceramic” humbucker at the neck), and found some sketchy online vendor who sells replicas of the original’s pinup-girl stickers, plus an even sketchier vendor who sells fake Gibson logos. We popped in the pickups, slapped on the stickers, and made a darn good replica for a bit over $500.

Wanna hear it?

Categories
Bass DIY Effects guitar

How to Install Onboard Effects

UPDATE: I’ve added a page listing all the “How To” posts on this site. Just click the cleverly titled How-To Posts Are Here! box at upper-right of each page.

There’s got to be a better way!

Several readers asked for more specific tech advice on how to wire up battery-powered effects inside a guitar or bass, so I created a step-by-step tutorial, which you can download here.

Some historical background: Since the ’60s, many guitar companies have toyed with the notion of installing battery-operated effects inside guitars.

And “toyed” is probably the perfect verb for it. Onboard effects have earned a reputation as cheesy, low-budget products. In many cases this reputation is justified. (And sometimes it’s not — the Electra guitars of the ’80s were never particularly popular, but their simple onboard distortion circuit has generated hundreds of “boutique” clones, not to mention our own Bad-Ass Distortion project).

And why would you want to put an effect inside a guitar or bass? You can use a stompbox with any electric instrument, but an onboard effect is married to one axe till solder-do-they-part.

I have an ironclad rebuttal to such concerns: 

Categories
DIY guitar Pickups

“Nashville” Tele Wiring . . . in a Strat?!

What do you get when you cross . . .

I’ve been coveting one of those “Nashville-Style” Telecasters — you know, the hot-rodded, three-pickup versions popularized by Nashville session superhero Brent Mason, and now a regular Fender production model.

Then it dawned on me: Since some of Mongrel Strats I’ve been playing with have strong Tele tendencies, why not flip the equation? Instead of a Tele that acts like a Strat, why not a Strat that thinks it’s a Tele?

The Fender version replaces the usual Tele 3-way switch with a 5-way, as shown in this wiring diagram, though many players prefer to keep the 3-way switch and add the middle pickup via a blend knob, as in this other wiring diagram.

I took the latter approach, and I am flipping out over all the new tones it unlocks. Check out this little video demo:

Categories
DIY guitar Pickups

The Pagey Project: Postscript

Does this guitar LOOK like it has over a hundred settings?

Just a quick follow-up on the Pagey project, which first recreated the original Jimmy Page wiring scheme, and then explored an even  more extreme version using Seymour Duncan Triple Shot Mounting Rings.

Once I’d finished the project, I had to decide whether to keep the guitar heavily modded, or revert to something simpler. It probably won’t surprise you to hear I decided to keep the extreme Phase 2 wiring, with its added germanium overdrive.

But as cool as the Duncan ’59 model pickups sounded, I wanted to revisit the Duncan Seth Lover pickups I’d previously had in the guitar. They’re bright — twangy, even — compared to the ’59s, and I like the midrange honk they add by virtue of being unpotted. (I’ve written about the pros and cons of potting here.)

I’ve recorded an example of how the guitar sounds with the Seth Lovers. (You can’t make exact comparisons with the previous Pagey videos, since I used an amp for those, while the new examples were recorded through an amp simulator, though the “Seth” character still shines through.) I’ve included the clip in the post after/above this one, because it’s my first audio example using SoundCloud, and I wanted to say a few words about that.

"There's GOLD in that thar pickup!"

And call me shallow, but…I really dig the way my guitar looks with the Seth Lovers installed. Between the teensy switches on the mounting rings and the push/pull pots, you really have to look hard to tell the guitar is not merely non-stock — it’s a morbidly overdeveloped tweak machine.

Funny — I’ve always found gold hardware a little bit tacky. But now I’m so enthusiastic about the look of gold that I feel like this guy at the right.

Categories
DIY guitar Pickups Recording

The Pagey Project, Phase 2:
An INSANELY Versatile Les Paul

Just how many colors can you coax from one guitar?

This post is about a guitar wiring scheme that only geeks and tweakers could love.

I think you’ll dig it. :satansmoking:

In Phase 1 of this project, I recreated the original Page wiring scheme using an ’82 Paul, a pair of Duncan ’59 model pickups, and four push-pull pots. The result was a great-sounding, almost absurdly versatile guitar, though the sheer number of options was downright bewildering.

So naturally, the only way forward was to make the instrument even more bewildering by adding additional sonic options. This version offers all the sound of the Phase 1 model, and a buttload more. Several buttloads, actually — and I’m not talking about those skimpy metric buttloads!

I gutted all the Phase 1 electronics. (Man, that hurt!) Next, using the same pickups, I added a pair of Duncan Triple Shot Mounting Rings. These provide four settings per pickup: humbucker, inner coil split, outer coil split, and both coils in parallel. (The Phase 1 plan offers only one split-coil setting per pickups. While you can configure the two pickups in parallel, you can’t do so with the individual coils in each pickup like you can here in Phase 2.) Here’s the wiring diagram I worked from, which for some reason is no longer posted on the Duncan site.

Since the Triple Shots add four new switches, the Phase 2 wiring requires only two push/pull pots. I wan’t about to let that real estate go unused! I installed a homemade germanium overdrive circuit (similar to the one we made in DIY Club) inside the guitar. My third push/pull pot activates it, and the fourth selects between two input caps, so I get a choice between a fat, Sabbath-style drive and a brighter, thinner Bluesbreakers-type tone.

Check out the demo video: