Categories
DIY guitar

My Top Three Wiring Mods

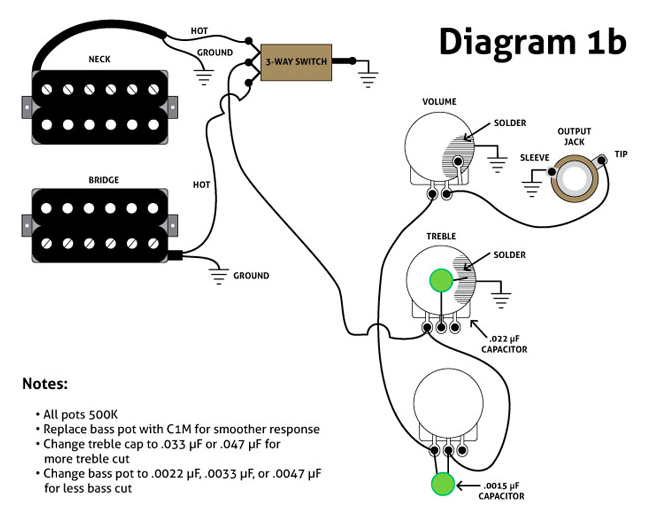
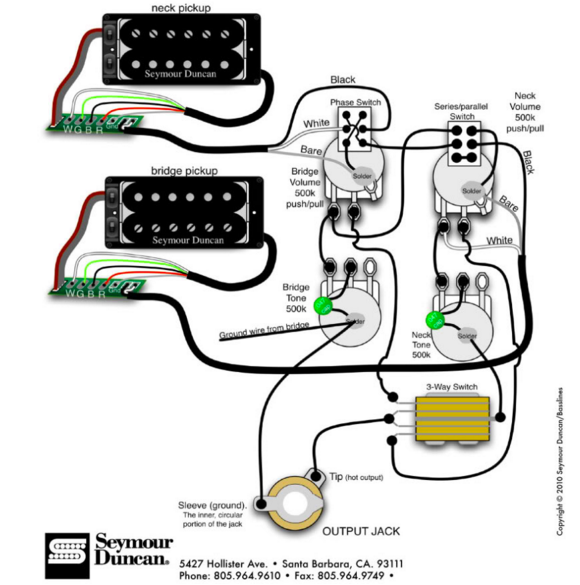
Premier Guitar just posted my new article on three favorite electric guitar wiring mods. The concepts won’t be new to anyone who hangs out here — I’ve pretty much flogged them all to death! But the new article includes the step-by-step walkthroughs that I never got around to creating for this site, and PG art director Meghan Molumby created beautifully clear tech diagrams like this one:


Screen Shot 2014-07-23 at 9.54.35 AM

The descriptions and instructions in the new story are clearer and more detailed than my original posts here, plus I’ve refined some details, so I suggest working from the new PG versions.

My three choices:

Yup, the ol’ PTB tone control, the coolest mod I know, at least for players who love distortion. The new version of the project uses the 500K pots you probably already have in your guitar rather than the more eccentric G&L values.

I also revisited the Strat version of the “Nashville-style” Tele wiring popularized by Brent Mason and other Music City cats. It performs brilliantly in a Strat, and IMHO its benefits (vastly more blended-pickup options plus a musical and intuitive control layout) for outweigh the costs (loss of the middle-pickup-alone setting, cost of a 3-way switch). Not to launch a protracted Strat-vs.-Tele battle, but I love the whole notion of “Tele-fying” a Strat via wiring, control layout, and pickup choice.

In the article’s comments thread, several savvy readers also mention Strat wiring systems that provide the sounds of the Nashville mod without sacrificing any others. They’re right — but the more I mess with this stuff, the more I value simplified operation. I’m less concerned with having all options than with having the coolest ones, ergonomically organized. Still, there are many ways you can go here.

Finally, I’m once more beating the dead Varitone horse exploring variations on Gibson’s Varitone concept, updated for modern players. I added a new twist in the PG story: deploying these ideas via toggle switches, rather than a big, clunky rotary switch.

It was fun when PG editor Shawn Hammond asked me to choose my favorite mods. It was easy to decide though — these are the three I keep coming back to, and all three deliver dramatic results, unlike many better-known mods.

So which electric guitar mods would be on your short list? Wiring, hardware, whatever. How do you make your guitars cooler?

Categories
DIY guitar

Bigsby + Vibramate + Les Paul

It’s a holiday miracle! The 30-minute Bigsby tremolo installation.

Sometimes it pays to write for a guitar magazine!

My old pal and Premier Guitar colleague Andy Ellis hipped me to the Vibramate, an adapter that allows you to install a Bigsby tremolo on many types of guitars with no drilling or other permanent modifications to your instrument.

A Bigsby and Vibramate were a centerpiece of a cool makeover project the magazine concocted, transforming a beat-up ’70s Epiphone in a bitchin’ Bigsby-bedecked bombshell. Inspired, I decided to give myself the shakes for Xmas. I bought a Bigsby B7 and corresponding Vibramate kit and popped them onto my long-suffering Les Paul. Check it out:

Yup, this is the much abused ’82 Les Paul that I’ve used in many tonefiend experiments, especially the OCD-approved Pagey Project. What a journey this guitar has been on! Never a big Les Paul fan, I picked up the cheapest old one I could find because I needed it as a reference for the sound design work I was doing for Apple. Trust me — it was a thoroughly unremarkable instrument. But then I started playing with pickups … and alternate wirings … and replacement hardware … and after several years of hacking, I have an instrument I love.

Pity about the gold hardware though — I should have switched to chrome early on. It’s the downside, I suppose, of incremental makeovers. By the time I got to the Bigsby, I had to cough up extra cabbage for the vulgar finish. (My wife recoiled when she saw the Bigsby box on the counter: “Eww — what’s this gold thing?”)

IMG_0361
The Vibramate bracket screws into the existing tailpiece bushings.

I’m no Bigsby expert. I’ve never owned a Bigsby-fitted guitar (though I’ve had a couple of long-term loan). It’s odd, because I like how they perform, look, and feel, and “bling cringe” aside, I love it on this guitar. It definitely changes the tone — though in spectacularly unscientific fashion, I replaced the previous roundwound strings with flatwounds while doing the installation, and it’s tricky to sort out which changes are exclusively related to that hardware, and which to the strings. The guitar feels brighter and more resonant. (I’m reminded of Ry Cooder’s dictum: The more springs you add to a guitar, the livelier the acoustic response.) The treble response is WAY different — I needed to lower the treble sides of the pickups to offset the face-slapping response of the high E string.

I’ve bored everyone to tears with my incessant testimonials to the glory of great flatwound strings. This guitar has never worn flats — I’ve kept it in roundwounds for writing product reviews, and for sessions where I specifically need a roundwound sound. But I’m loving the way they sound and feel here, so I guess I’ll have to select another Gibson-flavored guitar as a dedicated roundwound instrument.

The installation was a breeze. The quality of materials is superb. I also added Vibramate’s String Spoiler, a clever little bracket that clips onto the tiny nubbins that usually secure strings to a Bigsby. The Spoiler makes string changes way easier. I’m deeply impressed by the Vibramate products — even in frickin’ gold.

Oh — the demo tune is the late John Barry’s wonderful Midnight Cowboy theme. Berry wasn’t a guitarist, but he contributed so much to the guitar vocabulary through his scores, especially for the early James Bond films. I was privileged to interview Barry for Guitar Player back in the ’90s. What a cool and brilliant musician!

Categories
DIY guitar Pickups

“Vintage” Les Paul Wiring: BS or BFD?

Which sounds better: modern or vintage wiring? The experts disagree!

There’s a wealth of information online about the relative merits of “vintage” vs. “modern” wiring in Les Pauls. And after reading page after page on the topic, I was more confused than when I started. So here’s an attempt to pinpoint the sonic differences in a meaningful and relatively “scientific” fashion.

For those new to the debate, here are the basics: Nowadays tone pots in electric guitars usually connect to lug 3 of the volume pot, the same junction as the input from the pickup or pickup selector. Wired this way, the tone control siphons off highs before the volume control siphons off level. But in ’50s Les Pauls, the tone control often connects to lug 2, so treble is nixed after the volume pot does its thing. (I say “often,” because, as in so many other regards, vintage Gibson aren’t 100% consistent.) Here are some comparative schematics.

Most online sources manage to pinpoint the most basic difference: with vintage-style wiring, your tone retains more brightness as you lower the volume. But beyond that, there’s a buttload of b.s., including the frequent claim that vintage tone capacitors sound better or different from new ones. (They don’t.)

Anyway, I’ve made some comparative recording and measurements. After digesting all this geeky goodness, you’ll probably know whether ’50s wiring is an attractive option for you.

Categories
DIY guitar Pickups

The Pagey Project: Postscript

Does this guitar LOOK like it has over a hundred settings?

Just a quick follow-up on the Pagey project, which first recreated the original Jimmy Page wiring scheme, and then explored an even  more extreme version using Seymour Duncan Triple Shot Mounting Rings.

Once I’d finished the project, I had to decide whether to keep the guitar heavily modded, or revert to something simpler. It probably won’t surprise you to hear I decided to keep the extreme Phase 2 wiring, with its added germanium overdrive.

But as cool as the Duncan ’59 model pickups sounded, I wanted to revisit the Duncan Seth Lover pickups I’d previously had in the guitar. They’re bright — twangy, even — compared to the ’59s, and I like the midrange honk they add by virtue of being unpotted. (I’ve written about the pros and cons of potting here.)

I’ve recorded an example of how the guitar sounds with the Seth Lovers. (You can’t make exact comparisons with the previous Pagey videos, since I used an amp for those, while the new examples were recorded through an amp simulator, though the “Seth” character still shines through.) I’ve included the clip in the post after/above this one, because it’s my first audio example using SoundCloud, and I wanted to say a few words about that.

"There's GOLD in that thar pickup!"

And call me shallow, but…I really dig the way my guitar looks with the Seth Lovers installed. Between the teensy switches on the mounting rings and the push/pull pots, you really have to look hard to tell the guitar is not merely non-stock — it’s a morbidly overdeveloped tweak machine.

Funny — I’ve always found gold hardware a little bit tacky. But now I’m so enthusiastic about the look of gold that I feel like this guy at the right.

Categories
DIY guitar Pickups Recording

The Pagey Project, Phase 2:
An INSANELY Versatile Les Paul

Just how many colors can you coax from one guitar?

This post is about a guitar wiring scheme that only geeks and tweakers could love.

I think you’ll dig it. :satansmoking:

In Phase 1 of this project, I recreated the original Page wiring scheme using an ’82 Paul, a pair of Duncan ’59 model pickups, and four push-pull pots. The result was a great-sounding, almost absurdly versatile guitar, though the sheer number of options was downright bewildering.

So naturally, the only way forward was to make the instrument even more bewildering by adding additional sonic options. This version offers all the sound of the Phase 1 model, and a buttload more. Several buttloads, actually — and I’m not talking about those skimpy metric buttloads!

I gutted all the Phase 1 electronics. (Man, that hurt!) Next, using the same pickups, I added a pair of Duncan Triple Shot Mounting Rings. These provide four settings per pickup: humbucker, inner coil split, outer coil split, and both coils in parallel. (The Phase 1 plan offers only one split-coil setting per pickups. While you can configure the two pickups in parallel, you can’t do so with the individual coils in each pickup like you can here in Phase 2.) Here’s the wiring diagram I worked from, which for some reason is no longer posted on the Duncan site.

Since the Triple Shots add four new switches, the Phase 2 wiring requires only two push/pull pots. I wan’t about to let that real estate go unused! I installed a homemade germanium overdrive circuit (similar to the one we made in DIY Club) inside the guitar. My third push/pull pot activates it, and the fourth selects between two input caps, so I get a choice between a fat, Sabbath-style drive and a brighter, thinner Bluesbreakers-type tone.

Check out the demo video: