Categories
Bass DIY Effects guitar

How to Install Onboard Effects

UPDATE: I’ve added a page listing all the “How To” posts on this site. Just click the cleverly titled How-To Posts Are Here! box at upper-right of each page.

There’s got to be a better way!

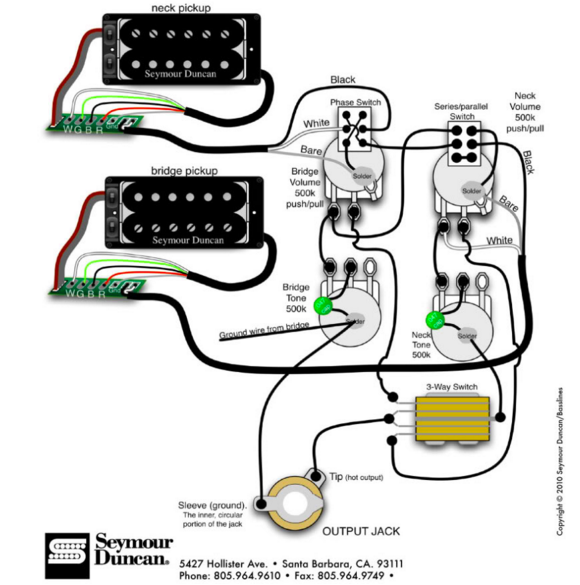
Several readers asked for more specific tech advice on how to wire up battery-powered effects inside a guitar or bass, so I created a step-by-step tutorial, which you can download here.

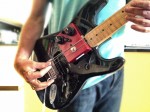
Some historical background: Since the ’60s, many guitar companies have toyed with the notion of installing battery-operated effects inside guitars.

And “toyed” is probably the perfect verb for it. Onboard effects have earned a reputation as cheesy, low-budget products. In many cases this reputation is justified. (And sometimes it’s not — the Electra guitars of the ’80s were never particularly popular, but their simple onboard distortion circuit has generated hundreds of “boutique” clones, not to mention our own Bad-Ass Distortion project).

And why would you want to put an effect inside a guitar or bass? You can use a stompbox with any electric instrument, but an onboard effect is married to one axe till solder-do-they-part.

I have an ironclad rebuttal to such concerns: 

Categories
DIY Effects guitar Pickups

Hello Kitty Strat: Not for Pussies!

Would this be anything less than awesome? I think not.

As I gloated last week, Jane Wiedlin gave me her Hello Kitty Stratocaster  — the most bitchin’ $99 guitar ever conceived! I finally had a chance to destroy/customize it yesterday, in what will no doubt be the first of many desecrations/enhancements.

I’d ordered one of those Synyster Gates Duncan Invaders with the pretty white pole pieces for the guitar, but just couldn’t wait to experiment, so I browsed through the ol’ pickup collection, and found a nice Duncan Phat Cat I’d used in a Les Paul experiment some months ago.

I don’t generally recommend choosing pickups because of their names, but come on! Kitty + Cat? How could I resist?

Turns out it was a lucky choice. I hadn’t planned to install a pickup that was actually lower in output than the stock humbucker, but it lets me get nicer clean sounds, and coughs up more than enough crunch when goosed with distortion. Speaking of which: the other custom feature is a built-in-distortion circuit activated via push-pull pot (I took lots of pics of the process for a DIY built-in-effects tutorial I’ll be posting very soon.)

View the carnage in this little video. Thanks, Jane Weidlin! Sorry, Stevie Nicks!

Categories
Bass DIY guitar

DIY Guitar Picks?

Borders went bankrupt. Now what the heck am I supposed to do with this pretty red card?

Behold my latest gizmo acquisition: the mighty Pick Punch!

It may look like a humble office stapler, but it stamps out standard-sized guitar picks from any compatible material.

I made picks from an old credit card, then another old credit card, and then . . . hey, folks, I need more ideas! What else would be a good, but unconventional, material for DIY picks?

FYI, this thing is sturdy, powerful, and sharp. If you stick your hand in it, you can probably make a decent skin-and-bone pick. When working with less self-destructive plastics, the edges are a little rough and furry, but nothing that a few seconds of sanding or playing wouldn’t sort out.

I found this treasure at the wonderfully silly gift site Think Geek, a nerd-toy emporium that specializes in such life essentials as the Zombie Head Cookie Jar and Alien Chestbuster Plush Toy. You can also order it directly from creator Von Luhmann via PickPunch.com. He also sells blank sheets of plastic advertised as similar to the material used in several popular pick types, plus sanders, inks, and so forth. He also sells a version of the Pick Punch that stamps out smaller, pointer “jazz style” picks. Pricing is reasonable: $24.95 for the Pick Punch, and $3.25 for enough plastic stock to 60 or so picks.

One advantage of buying directly from Luhmann rather than Think Geek: You won’t be tempted to outfit yourself with one of these.

Anyone out there in the habit of making their own picks? Show and tell, please!

Categories
DIY guitar Pickups

“Vintage” Les Paul Wiring: BS or BFD?

Which sounds better: modern or vintage wiring? The experts disagree!

There’s a wealth of information online about the relative merits of “vintage” vs. “modern” wiring in Les Pauls. And after reading page after page on the topic, I was more confused than when I started. So here’s an attempt to pinpoint the sonic differences in a meaningful and relatively “scientific” fashion.

For those new to the debate, here are the basics: Nowadays tone pots in electric guitars usually connect to lug 3 of the volume pot, the same junction as the input from the pickup or pickup selector. Wired this way, the tone control siphons off highs before the volume control siphons off level. But in ’50s Les Pauls, the tone control often connects to lug 2, so treble is nixed after the volume pot does its thing. (I say “often,” because, as in so many other regards, vintage Gibson aren’t 100% consistent.) Here are some comparative schematics.

Most online sources manage to pinpoint the most basic difference: with vintage-style wiring, your tone retains more brightness as you lower the volume. But beyond that, there’s a buttload of b.s., including the frequent claim that vintage tone capacitors sound better or different from new ones. (They don’t.)

Anyway, I’ve made some comparative recording and measurements. After digesting all this geeky goodness, you’ll probably know whether ’50s wiring is an attractive option for you.

Categories
DIY guitar Pickups

“Nashville” Tele Wiring . . . in a Strat?!

What do you get when you cross . . .

I’ve been coveting one of those “Nashville-Style” Telecasters — you know, the hot-rodded, three-pickup versions popularized by Nashville session superhero Brent Mason, and now a regular Fender production model.

Then it dawned on me: Since some of Mongrel Strats I’ve been playing with have strong Tele tendencies, why not flip the equation? Instead of a Tele that acts like a Strat, why not a Strat that thinks it’s a Tele?

The Fender version replaces the usual Tele 3-way switch with a 5-way, as shown in this wiring diagram, though many players prefer to keep the 3-way switch and add the middle pickup via a blend knob, as in this other wiring diagram.

I took the latter approach, and I am flipping out over all the new tones it unlocks. Check out this little video demo:

Categories
Bass DIY Pickups

A Cool Alternative Tone Control for Bass

Looks vintage, but it ain't.

After auditioning so many different tone-control schemes over the course of the Mongrel Strat Project, I wound up with more tone circuits than I have Strats, so I figured I’d victimize a bass — specifically, a 1954 Fender P-Bass reissue with a Seymour Duncan Quarter-Pound pickup, which I’ve written about here. It’s a minimalist one-pickup model with basic volume and tone controls.

I was eager to audition a multi-capacitor tone control like I wrote about here. (Actually, it’s literally the same tone control — the guitar where it used to reside now houses the Stellartone ToneStyler tone pot covered here.) And while I had the patient on the operating table, I figured I’d also install the Black Ice distortion cube I wrote about here. (My friends in the medical profession assure me that patients always appreciate it when surgeons indulge in improvisational operating-theater mods.)

Demo and details after the break:

Categories
Bass DIY guitar

PRINT Your Own Guitar Parts?!

Yes, it's bad Photoshop. You can't REALLY print a guitar at home . . . not quite yet, anyway.

UPDATE: Check out the comments, where reader J links to videos of a 3D-printed guitar and violin.It’s cool and INTENSE.

Last weekend I got to enjoy one of my favorite things in the universe: the Maker Faire, held each year in San Mateo, California, outside San Francisco.

The event, which draws 100,000 people each year (not counting the thousands who attend satellite fairs in NYC, Detroit, and other cities), was launched by Make magazine, the closest thing to a house publication for the international DIY movement. Adherents of maker culture — or just plain “makers” — are a loose aggregation of artists, geeks, hackers, Steampunks, subversive ETSY craftspeople, and others who embrace various facets of DIY culture. “If you can’t open it, you don’t own it” is one of many unofficial mottos. Another is “Void your warranty, violate a user agreement, fry a circuit, blow a fuse, poke an eye out…”

And who isn’t in favor of poking out a few eyes? 😉

The Faire, now in its eighth year, is a joyous affair, assuming you derive joy from things like flashing Van der Graaf generators, 50-foot-tall kinetic sculptures that spew fire, the Faire’s iconic cupcake cars, and the sight of hundreds of cute kids learning to solder DIY projects at rows of workstations.

Each year there’s more new stuff than you can possibly consume, but even even amidst the ear-pounding experimental music and eye-pounding LED art, one development seemed to dominate: 3D printers are getting faster, smarter, and cheaper (as in, several DIY kits sell for less than $500). And it’s difficult to imagine them not changing how we will create and mod our musical instruments in the very near future.

Categories
DIY guitar

Two-Band “PTB” Tone Control:
Useful, Easy, Cheap & AWESOME!

The PTB Circuit was one of many G&L innovations.

After the frantic soldering fest that was The Pagey Project, I figured it might be time for a nice, simple DIY wiring project. At the suggestion of tonefiend reader JH, I played with variations on the 2-band tone control that appeared in some G&L guitars. And I am over the moon with the results!

This circuit, sometimes called “PTB” (for “passive treble and bass”) combines a standard treble-bleed tone knob with a bass-cut control. The latter has a huge effect on the way distortion pedals and amps respond to the pickups, especially with humbuckers. Cutting some bass makes the pickups sound cleaner, airier, and more dynamic (i.e., less compressed). To my ear, the bass pot is not so much a tone control as a clarity knob.

Check out this brief demo video:

Categories
DIY guitar Pickups

The Pagey Project: Postscript

Does this guitar LOOK like it has over a hundred settings?

Just a quick follow-up on the Pagey project, which first recreated the original Jimmy Page wiring scheme, and then explored an even  more extreme version using Seymour Duncan Triple Shot Mounting Rings.

Once I’d finished the project, I had to decide whether to keep the guitar heavily modded, or revert to something simpler. It probably won’t surprise you to hear I decided to keep the extreme Phase 2 wiring, with its added germanium overdrive.

But as cool as the Duncan ’59 model pickups sounded, I wanted to revisit the Duncan Seth Lover pickups I’d previously had in the guitar. They’re bright — twangy, even — compared to the ’59s, and I like the midrange honk they add by virtue of being unpotted. (I’ve written about the pros and cons of potting here.)

I’ve recorded an example of how the guitar sounds with the Seth Lovers. (You can’t make exact comparisons with the previous Pagey videos, since I used an amp for those, while the new examples were recorded through an amp simulator, though the “Seth” character still shines through.) I’ve included the clip in the post after/above this one, because it’s my first audio example using SoundCloud, and I wanted to say a few words about that.

"There's GOLD in that thar pickup!"

And call me shallow, but…I really dig the way my guitar looks with the Seth Lovers installed. Between the teensy switches on the mounting rings and the push/pull pots, you really have to look hard to tell the guitar is not merely non-stock — it’s a morbidly overdeveloped tweak machine.

Funny — I’ve always found gold hardware a little bit tacky. But now I’m so enthusiastic about the look of gold that I feel like this guy at the right.

Categories
DIY guitar Pickups Recording

The Pagey Project, Phase 2:
An INSANELY Versatile Les Paul

Just how many colors can you coax from one guitar?

This post is about a guitar wiring scheme that only geeks and tweakers could love.

I think you’ll dig it. :satansmoking:

In Phase 1 of this project, I recreated the original Page wiring scheme using an ’82 Paul, a pair of Duncan ’59 model pickups, and four push-pull pots. The result was a great-sounding, almost absurdly versatile guitar, though the sheer number of options was downright bewildering.

So naturally, the only way forward was to make the instrument even more bewildering by adding additional sonic options. This version offers all the sound of the Phase 1 model, and a buttload more. Several buttloads, actually — and I’m not talking about those skimpy metric buttloads!

I gutted all the Phase 1 electronics. (Man, that hurt!) Next, using the same pickups, I added a pair of Duncan Triple Shot Mounting Rings. These provide four settings per pickup: humbucker, inner coil split, outer coil split, and both coils in parallel. (The Phase 1 plan offers only one split-coil setting per pickups. While you can configure the two pickups in parallel, you can’t do so with the individual coils in each pickup like you can here in Phase 2.) Here’s the wiring diagram I worked from, which for some reason is no longer posted on the Duncan site.

Since the Triple Shots add four new switches, the Phase 2 wiring requires only two push/pull pots. I wan’t about to let that real estate go unused! I installed a homemade germanium overdrive circuit (similar to the one we made in DIY Club) inside the guitar. My third push/pull pot activates it, and the fourth selects between two input caps, so I get a choice between a fat, Sabbath-style drive and a brighter, thinner Bluesbreakers-type tone.

Check out the demo video: