Categories
DIY guitar

Telecaster Deluxe Variations: Six Pickups and Some Weird Wiring

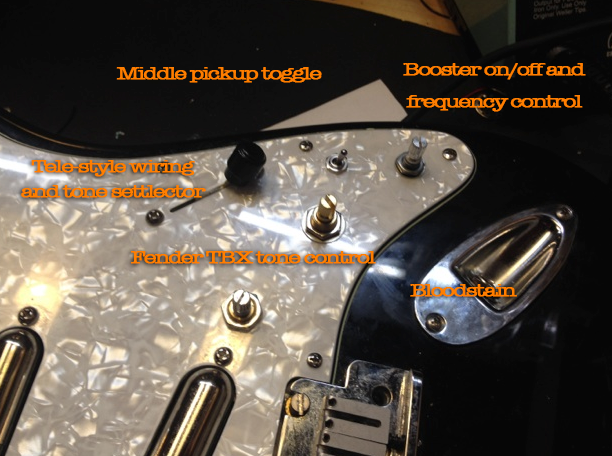
Fender’s Telecaster Deluxe has had an interesting and checkered history. Once regarded as yet another mediocre product from the company’s era of CBS ownership, these turn-of-the-seventies instruments now fetch huge prices on the collector’s market. I’ve never owned own. But when singer/songwriter Greer Sinclair loaned me one of Fender’s 2010 reissues, it was time for research — and experimentation.

The made-in-Mexico 1972 Deluxe reissue is a cool guitar. It replicates many details of the original: the oversized headstock, the Strat-like belly cut and fixed Strat-style bridge, and the big-ass pickguard. But its pickups are definitely a departure. In lieu of the original’s large-format “Wide Range” pickups, it employs a P-94R (a humbucker-sized P-90 spinoff) at the neck, and a conventional Gibson-style humbucker at the bridge.

The Wide Range pickup was a unique beast. Fender had commissioned Seth Lover, the man who invented the Gibson humbucker, to create a Fender humbucker in hopes of cashing in on the growing popularity of hard rock. With DC resistance in the 10k range, the new Wide Range pickup was a bit hotter than a vintage Gibson humbucker. Wide Range pickups appeared in several of the era’s models, including the Tele Thinline, Tele Custom, and semi-hollowbody Starcaster.

Gibson humbuckers have a bar magnet within, but the pole pieces are not magnetic. But on Wide Range pickups, the pole pieces are magnetic, as on Fender’s single-coil pickups. Situating individual magnets closer to the strings yield a brighter sound with greater note defition and string-to-string separation — characteristics we associate with vintage Fender pickups. So the Wide Range pickup lent a uniquely “Fender” twist to the Gibson design.

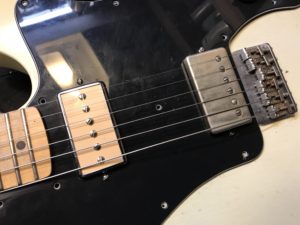
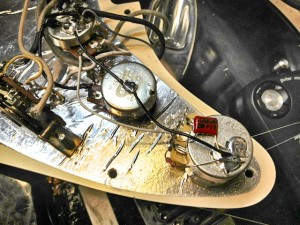
Wide Range pickups are slightly larger than conventional humbuckers. Most of Fender’s circa-1970 Tele reissues substitute generic humbuckers of the standard size. Standard humbuckers can sound superb in a Tele, but they’re horses of different colors. Fender has also created some reissues with the larger-sized pickups, but these are also garden-variety humbuckers — the larger format is purely cosmetic. The pole pieces of the factory humbucker on Greer’s guitar don’t align with Fender’s wider string spacing. (But one thing I’ve leaned from my various Fender/Gibson hybrid experiments is that sonically, this can matter very little.)

The P-94R’s cream-colored top looks wicked against the guitar’s finish. It’s a warm, full-sounding pickup from the mellower side of the P-90 spectrum. Actually, it doesn’t sound all the different from a traditional Telecaster neck pickup. (Like that pickup, it works quite well for jazz.) Note, though, that its dimensions differs substantially from those of a Gibson P-90, as you can the in the photo where it sits alongside a historically accurate Lollar P-90. When you change the size of a pickup’s components, you inevitably alter the sound. The tones can be for better or worse — but they will be different.

Categories
guitar

The PAF Strat

As threatened, here’s a closer look at Strat with PAF humbuckers used for my recent “God Only Knows” cover. Most parts are from the long-suffering guitar used for all the Mongrel Strat Project experiments. And this one is especially mongrel-ific, with its blend of vintage Fender and Gibson.

Obviously, Gibson pickups is a Strat is far from a new idea. But usually, that arranged marriage is designed to spawn macho, high-gain solos minus the characteristic shrillness of vintage Strat bridge pickups. While many players I love have used humbucker-equipped Strats, I’ve always loathed playing them myself. But what, I wondered, if you didn’t use a hot humbucker, but an über-vintage PAF?

Like many players my age and younger, I was astonished when I first encountered a vintage-voiced humbucker. It was nothing like the dark, over-overdriven tones I associated with the word humbucker. A good PAF is sparkly, resonant, and perfectly capable of gloriously bright and clean tones. Here I used a Seymour Duncan Joe Bonamassa signature set, the same one heard in a more Gibson-like context here.

The results are … compelling. As expected, notes have far more mass than on a conventional Strat, and the bass response is vastly increased. There’s no shortage of top-end either, though the big lows can overwhelm the highs at times. So while I’m pretty much always obsessed with bass-cut controls (especially the high-pass section of the PTB circuit I’ve written about approximately 37 zillion times), it’s especially invaluable in this case. Since lows disproportionately drive distortion, even modest bass cuts clean up the tone and make highs speak more clearly.

I’ve also incorporated the dual-capacitor treble control I wrote about here. It creates a Vari-Tone/ToneStyler effect in a simplified way: Instead of using a clunky rotary switch to choose from a large set of treble-trimming capacitors, it fades between a large cap and a small cap, yielding the same resonant effect as the more complex options. I’ve incorporated this circuit in several guitars now, and it’s still working for me. It’s especially nice here, when paired with a Steinberger JackPot potentiometer, which lets you bypass the entire tone circuit for absolute maximum volume and brightness. I chose the small cap based on the minimum amount I’d ever want to remove from the signal, and the larger one based on the maximum cut I’d use.

I would have included a photo of the project in progress, but I didn’t because I’m embarrassed about how awful it looks inside. I needed to route out the pickup cavities to accommodate these larger pickups. But instead of taking it to a professional, or getting a proper router and learning how to use it, I chipped away with the tiny routing bit on an inexpensive Dremel tool. Do yourself a favor, kids, and don’t follow my lazy-ass example.

But hey, what’s a Strat pickguard for if not to conceal your shoddy workmanship? The guitar looks okay in the end, and I’m digging its sounds, even though it was far harder to get accustomed to than I’d anticipated. I had to recalibrate my right-hand dynamics to prevent treble notes from screeching. I was almost ready to chalk this up as a failed experiment, but after a few days of noodling around, I started to get the hang of it and enjoy the results. I think I’ll keep it this way for a while — or at least until the next Mongrel Strat concept wafts up from the bowels of Hell. 🙂

Categories
DIY

A New Tone Control Concept — or Is It?

Hey, smart people — let me get your take on this. I’ve been playing with a new tone control idea that’s so simple, I can’t believe no one’s done it before. (Chances are someone has.)

Here’s the idea: Conventional electric guitar tone controls employ a single pot and single capacitor connected to ground. As you turn the pot, more signal goes to ground for a darker sound. The capacitor value determines the cutoff frequency — the larger the cap, the lower the cutoff frequency and the darker the sound. In other words, the cutoff frequency is fixed, but the percentage of signal that gets cut off changes as you move the pot.

Meanwhile, the Gibson Vari-Tone circuit uses a rotary switch rather than a pot, and a set of capacitors of ascending size. The small caps have a brighter tone, and the large ones sound darker. But once a cap is engaged, it’s engaged all the way. In other words, the cutoff frequency varies as you move the switch, but not the percentage of affected signal—it’s always 100%.  (The Stellartone ToneStyler employs the same concept, with as many as 16 caps arranged around a rotary switch.)

But do you really need all those caps? Why not use the tone pot to fade between a small cap and a large one, like so:

double cap

Here, the brighter/lower-value cap is engaged when the pot’s all the way up. As you roll it back, the larger cap is introduced, producing greater capacitance and a deeper treble cut. When you arrange caps in parallel, their total capacitance is the sum of their values. For example, I tried a .0047µF cap and a .047µF, so the minimum value is .0047µF (a very modest cut) and the maximum is approximately .052µF (a very dark tone).

So far I’ve only tried this on breadboard, though I plan to deploy it in a new “parts” guitar I’m assembling. So far it sounds … really good. A lot like a ToneStyler, actually, but with fewer parts and handpicked values. The only tricky thing was finding a good pot value where all the action wasn’t bunched up at one end of the knob’s range. A reverse-log pot worked best for me—I got nice results with both a C500K and C1M.

I often use similar wiring to alter the value of the input cap on distortion pedals. (High values filter our more bass for a brighter/cleaner sound.) But I’m not aware of anyone having tried this on a guitar tone control.

Another issue is the fact that, in this circuit, the tone pot always has a cap engaged. You could use a really tiny value for the smaller cap so there’s little perceptible cut at the minimum setting, but that can make a substantial part of the pot’s range a little too subtle. So my plan is to combine this with a Ned Steinberger-designed JackPot as the volume control. This part has an “off” setting that bypasses the tone circuit entirely for a maximum-bright sound. That way, I’d choose for the smaller cap a value that provides the minimum treble cut I’m likely to want. (I suspect I’ll wind up with something between .0022µF and .0047µF.)

Have any of you seen or heard of such a guitar circuit? If so, any observations or advice?


Categories
DIY guitar

My Top Three Wiring Mods

Premier Guitar just posted my new article on three favorite electric guitar wiring mods. The concepts won’t be new to anyone who hangs out here — I’ve pretty much flogged them all to death! But the new article includes the step-by-step walkthroughs that I never got around to creating for this site, and PG art director Meghan Molumby created beautifully clear tech diagrams like this one:


Screen Shot 2014-07-23 at 9.54.35 AM

The descriptions and instructions in the new story are clearer and more detailed than my original posts here, plus I’ve refined some details, so I suggest working from the new PG versions.

My three choices:

Yup, the ol’ PTB tone control, the coolest mod I know, at least for players who love distortion. The new version of the project uses the 500K pots you probably already have in your guitar rather than the more eccentric G&L values.

I also revisited the Strat version of the “Nashville-style” Tele wiring popularized by Brent Mason and other Music City cats. It performs brilliantly in a Strat, and IMHO its benefits (vastly more blended-pickup options plus a musical and intuitive control layout) for outweigh the costs (loss of the middle-pickup-alone setting, cost of a 3-way switch). Not to launch a protracted Strat-vs.-Tele battle, but I love the whole notion of “Tele-fying” a Strat via wiring, control layout, and pickup choice.

In the article’s comments thread, several savvy readers also mention Strat wiring systems that provide the sounds of the Nashville mod without sacrificing any others. They’re right — but the more I mess with this stuff, the more I value simplified operation. I’m less concerned with having all options than with having the coolest ones, ergonomically organized. Still, there are many ways you can go here.

Finally, I’m once more beating the dead Varitone horse exploring variations on Gibson’s Varitone concept, updated for modern players. I added a new twist in the PG story: deploying these ideas via toggle switches, rather than a big, clunky rotary switch.

It was fun when PG editor Shawn Hammond asked me to choose my favorite mods. It was easy to decide though — these are the three I keep coming back to, and all three deliver dramatic results, unlike many better-known mods.

So which electric guitar mods would be on your short list? Wiring, hardware, whatever. How do you make your guitars cooler?

Categories
DIY Effects guitar

The Lipstick Lab
New Experiments with Old Pickups

Do you ever get an idea that you just know is going to work out brilliantly? And then discover you were totally wrong?

That’s how it was when I finally reassembled my generic Mexican Strat with Duncan lipstick tube pickups. After I recorded a demoing of it here almost two years ago, the guitar lay in pieces alongside my workbench. I’d stare at decapitated body, feeling guilty and dreaming of all the fantastic mods I’d attempt when I finally got around to reanimating it. I had various ideas for the tone control: Maybe a two-band PTB control? Nope—totally underwhelming results. Perhaps a two-in-one TBX? Meh—even less interesting. I drew a blank, and the guitar wound up with a disappointingly normal tone circuit.

But I did discover some cool twists along the way. Details after the video:

My flatwound string addiction is only getting worse, but this is the first time I’ve combined flats and lipstick tubes. (Has anyone done that since the ’50s?) The results were fascinating. As happens when you put flats on an electric 12-string, you encounter a paradoxical increase in highs, despite the darker-toned bass strings. (Maybe it’s because the treble strings ring truer with less phase-canceling interference from roundwound bass strings.) As you can hear, this instrument doesn’t lack for zing.

The opposite, actually — treble notes explode from the instrument, often more than you’d like. I experimented with various action and pickup height adjustments, but no matter how I set things, it was difficult preventing certain notes from shrieking. The only solution was to play the damn guitar for a few hours and grow accustomed to the touch.

Categories
DIY Effects guitar Pickups

Blood on the Workbench

Small puncture, big pain.

I was trying to decide which self-indulgent experiment fascinating project to demo this week when my hand slipped, driving a sharp soldering iron tip into the meat of my fretting-hand index finger. It didn’t hurt all that much—until I tried to play. Ye-OWCH! (No, of course I wasn’t using the tool properly! I was trying to pick loose a knot of wire with the iron’s tip rather than the recommended wire-picker-thingy.)

So no guitar recordings for me this week while my poor l’il finger recuperates. But I’ll try to compensate for this dog-ate-my-homework post by sharing three works in progress. If they turn out well (and they might!), audio and video will follow.

1. Lipstick Tubes Revisited. For more than a year, the generic Mexican Strat I fitted with lipstick tube pickups has lived, disassembled, in a filthy cardboard box next to my workbench, guilt-tripping me every time I fired up the soldering iron. There were a number of experiments I’d been meaning to perform on it, and in a spectacularly bad example of scientific methodology, I incorporated them all at once, making it pretty much impossible to discern what’s doing what. But I hear some things I like. Here’s what’s new (beside the blood spatters):

lipstick_labeled

Not everything is working as desired yet — but there are some promising directions here, and it’s so nice to have a lipstick tube instrument again. :pacman:

Joystick fuzz: like giving a loaded gun to a monkey.

2. The Joy of Stick. Anyone tried a joystick effect, like Devi Ever’s Drone Fuck Drone? I bought a few joysticks from 4Site and have been having a blast. I thought they’d be difficult to wrangle, but it’s really just two pots, each with the standard three-lug connection, deployed in X/Y configuration. Two things to bear in mind, though: They’re generally available only with identical resistance values for each pot, and more important, you need two controls that have meaningful values throughout their ranges. Fortunately, I had just the circuit for it: my Filth Fuzz (which Fuzzbox Girl was kind enough to demo and review in 2011). I’d even labeled the controls X and Y! (I’m not selling these, but I do hope to bring it to market before long. Honest.)

photo

3. A Reanimated Amp.  This one’s personal: I’m finally refurbishing the 1951 “TV front” Fender Deluxe amp that I received for as a bar mitzvah present in the ’70s. (I was mature enough not to express my disappointment over getting some crummy old tweed. But how I longed for that shiny post-CBS crap!) My mom procured it from the son of one of her fellow elementary school teachers, who worked at Fender in nearby Fullerton. (Sadly, I’ve forgotten his name.) I also got to pick from three early-’70s Fender guitars: a sunburst Strat, a paisley Tele, and a black Jazzmaster. I, of course, chose the Jazzmaster — at the exact moment when no one on earth gave a crap about that model.  And naturally, I sold it just when new wave arrived and Jazzmasters became cool again. See? I established my pattern of buying and selling the wrong things at the wrong times while still in my teens!

I didn’t wreck the amp by myself — the process started with the black paint job it acquired long before I entered the picture. Over the years it received a preamp mod from Paul Rivera, and later got totally ruined by an overambitious repairman who added mods I never requested, and who probably stole most of the original electronic parts. But the cab, chassis, speaker, and output transformer are original, and there’s no reason why it shouldn’t sound bitchin’ after I restore it to its original 5A3 circuit. I’m getting expert help from Tube Depot’s Rob Hull, who helped me source parts and make a grommet board to house the components.

So my apologies for all talk, no audio. My boo-boo is healing, and I should be back able to, like, actually play some of this stuff soon!

Categories
DIY guitar

The Fender TBX:
A Cool 2-Band Tone Control

You can TELL it's Photoshopped! There's no TBX!
You can TELL it’s Photoshopped! There’s no TBX!

Thanks again to everyone who chimed in on the “What your favorite mod?” discussion. I got tons of great ideas from your comments.

Like this one, which I’ve been meaning to explore for ages: the Fender TBX tone control circuit, which appears in several Custom Shop instruments, notably the Clapton signature Strats. Like the G&L PTB circuit I’m so apeshit about, it’s a 2-band passive tone control — but one that sounds very different.

The PTB is a two-knob circuit that lets you siphon off highs, lows, or both. I’m agog at how well it works with humbuckers — you can get so many cool sounds by rolling off lows on the way to a fuzz, as heard here.

But TBX (it stand for “treble bass expander”) is a one-knob circuit, tbough that single knob rotates two stacked pots. The control has a center detente. Set here, it’s like a regular tone control, wide-open. Turn it counter-clockwise and highs vanish, per usual. (You could “tune” the roll-off frequency with various capacitors, though I went with the stock .022uF.) But when you rotate clockwise, the absence of lows makes glassy highs erupt.

The dual pot cut highs or lows.

Technically, it’s not a boost, but it sure feels like one. Dirk Wacker, my now-colleague at Premier Guitar, dissects the circuit far more capably than I can here. (And he goes way beyond in this subsequent article on TBX mods. Man, I have some catching up to do!) He makes a good case for replacing the stock resistor with another value, but I went with the original 82K to establish a point of reference. I’ll try his mod when I restring, and I’ll update you here.)

BTW, you need the Fender TBX kit for this project — it uses highly customized pots to work its magic, and a standard stacked pot won’t do. But it’s cheap: You can find the TBX kit, with the pot, hardware, and passive components, online for about $15.

I put it into the mongrel strat I’ve been using as my digital synth/looping guitar. I’d been using a Stellartone Tone Styler, a cool Vari-Tone variant that switches between multiple capacitors. I dig it, but it’s the old model which clicks, rather than fades, from setting to setting, and it requires a powerful twist of the wrist to go from maximum to minumum, which I do every time I grab an EBow. Since I hadn’t gotten around to replacing it with the smooth-action version, I figured I’d try the TBX.

And I’m glad I did. It’s a super-easy install, at least to the extent that any job that requires removing both strings and pickguard can be easy.And here’s how it sounds:

I’m going to keep this one around for awhile. You’re hearing it through an analog rig, obviously, but I want to find out whether that extra shot of highs does anything meaningful when playing digitally. I’d also like to experiment with different cap and resistor values.

And now I can’t help wondering whether this would sound cool with humbuckers. Anyone have any experience with that?

Categories
DIY guitar

What’s Your Favorite Mod? (Here’s Mine.)

How am me make guitar thing better?

What’s your favorite guitar mod? The kind that changes how you play. One you’ve become so accustomed to that you wince when you pick up an axe that lacks it?

I’ll choose pickup wiring mods as a starting point: During the year that Seymour Duncan sponsored tonefiend.com, I devoted many posts to the under-appreciated wiring schemes I found in the company’s wiring diagram database. Some faves:

…and of course, the suicidal soldering mission known as the Pagey Project.

I’ve still got the “advanced” version of the Pagey wiring in my nothing-special beater Les Paul, and I like it so much, I want to fix up the guitar so it feels as nice as it sounds.

But of all the wiring experiments I tried, my absolute favorite is one that doesn’t appear in the Duncan archives: the so-called “PTB” tone control (for “passive treble and bass”). It’s a cliché to call a neglected idea “ahead of its time,” but in this case, it happens to be true. Being able to roll off lows as well as highs is unbelievably useful when sculpting sounds. It makes me want to run into the nearest Bain Capital Guitar Center, grab players by the collar, and shout, “You need to know about this!” (But I probably won’t, ’cause G.C. customers aren’t accustomed to receiving that sort of personal attention, and I wouldn’t want to freak them out.)

Allow me to repost last year’s video, demonstrating the circuit in action:

Over a year later, I remain totally addicted to this circuit, and I recommend it to anyone who doesn’t require a guitar with independent volume controls per pickup. (Everyone, basically.) It seems especially relevant for drop-tuned and 7-string metal players who realize you must sometimes cut a little bass to keep the lowest register tight and articulate. And the circuit is a godsend when used with bass-heavy fuzz pedals (such as vintage-style Fuzz Faces). In fact, I’ve even been building the circuit into the front end of certain loud fuzz pedals for use with guitars lacking this magnificent mod.

But I remembered something interesting this week when I opened up the Hamer 20th Anniversary guitar used in the video:

Categories
Effects guitar

Fuzz Detective Appendix 1.0

D’oh! I omitted a circuit from the Fuzz Detective video. It’s the germanium version of the Shin-Ei Companion Fuzz FY-2. So here’s a brief Fuzz Detective Appendix.

The silicon version of the FY-2 is a cult item, a nasty little thing best known for its appearance on Jesus and Mary Chain’s Psychocandy album. The germanium version (which I didn’t even know existed until reader Bear pointed it out!) is a very different beast. Most notably, it lacks the silicon version’s signature midrange scoop, delivering a thicker, fatter sound.

As noted in the video, I replaced the stock B50K gain pot with a B5K. (The overall range of tones is pretty much the same, but this way, all the variations aren’t crammed into 10% of the knob’s range.) Construction details and testing procedures are the same as they were for the 12 Fuzz Detective pedals.

Categories
DIY Effects guitar

The Fuzz of a Thousand Faces

Lon Chaney was reportedly an early user of the Fuzz Face.
Lon Chaney was an early Fuzz Face user.

It is a truth universally acknowledged that a guitarist in possession of a single Face Fuzz must be in want of cool Fuzz Face mods. (Sorry, Jane.)

Case in point: The comments section for the new Fuzz Face project.

We’re far from the first to cover this ground. In fact, I should have mentioned a couple of great articles on Fuzz Face mods. We’ve talked about the technique of using sockets in your build so you can audition multiple components. Years ago DIYer Gary Burchett took this notion to its logical conclusion with the Multi-Face, a Fuzz Face with most of the components socketed. It’s definitely worth trying this. Meanwhile, this Instructables project by randofo explains how to create a super-versatile Fuzz Face using switchable components.

Trust me — despite the simplicity of the circuit and the sheer number of adventurous souls who have deconstructed and reconstructed it, it’s hard not to play around with it and find something cool and new. That too is a truth universally acknowledged!